DSC_0045-2-1

Black Cherry and Chocolate Tart

I was challenged by Canned Food UK to create a recipe using a canned food, and I’ve gone for something easy but completely delicious. Black cherry and chocolate tart just sounds good, right? I mean, cherries and chocolate are a classic match. Think black forest gateaux. The great thing about this cherry and chocolate tart, though, is that it’s actually really simple to make. Even though it looks pretty fancy.

Canned cherries are definitely your friend here. Cherries are one of my favourite fruits, and they come up on this blog a lot. While fresh cherries are amazing, they won’t always be in season and they are often expensive. Plus, using fresh cherries here would mean adding the extra step of stoning your fruit. And that isn’t going to be happening in a recipe that’s all about simplicity.

DSC_0006-1-1024x683

We’re also saving time and effort on the base. I love pastry, and I love making it, but I’m not going to lie – sometimes I just cannot be bothered. You could definitely make this cherry and chocolate tart with a traditional shortcrust or sweet pastry, but you don’t need to. As ever, biscuits are your friends. Biscuits will always be there for you. Biscuits won’t let you down.

DSC_0044-1-1024x683

So we’ve got a dark and chocolatey buttery biscuit base (any excuse). We’ve got a rich and smooth chocolate filling, just holding together and then melting away in the mouth. And we’ve got those plump black cherries, steeped in a decadent kirsch syrup.

I might go and make it again, actually.

DSC_0048-683x1024

Notes:

You can add a few little flourishes to this chocolate and cherry tart. Or you can skip them entirely. It’s completely up to you. It’s beautiful plain, but if you feel inclined to finish it off with crème fraiche and almonds, it’s a little extra touch that makes this tart even more special.

Ingredients:

1 can (425g) pitted black cherries
150ml kirsch (brandy or Grand Marnier also work well, or use juice from the can if you are avoiding alcohol)
30g caster sugar
Pared strip of lemon zest

For the base

30 Oreos (chocolate bourbon biscuits also work well)
50g dark chocolate (ideally 70% cocoa solids), broken into small pieces
50g butter
½ tsp sea salt

For the filling

300ml double cream
2 tsp caster sugar
½ tsp sea salt
50g butter, cubed
200g dark chocolate (ideally 70% cocoa solids), broken into small pieces
50ml whole milk

To finish

A handful of whole almonds, finely chopped (optional)
Crème fraiche to serve (optional)

Method:

  1. Drain your cherries, then place them in a small saucepan with the kirsch, sugar, and lemon zest. Simmer for five minutes, then take off the heat and leave to sit while the flavours infuse.
  2. Pop your biscuits and chocolate for the tart base in the food processor, then give them a good blitz until you’re left with crumbs. Add the butter and salt, and blitz again until the mixture clumps. Press your biscuit mixture into the base of a non-stick, loose-bottomed tart tin of around 23cm diameter. Work the mixture up the sides of the tin, pressing it into the flutes with your fingers, and make sure the base of the tin is well covered and as smoothly lined as possible. Pop the tin in the fridge for the base to set.
  3. For the filling, put your cream, sugar, and salt in a saucepan and bring to the boil. Put your butter and dark chocolate in a glass bowl, then pour over the boiling cream mixture. Stir until smooth and blended – it might take a couple of minutes to come together, as the chocolate melts. Stir in the milk and keep stirring until the mixture is smooth and shiny.
  4. Drain your cherries, remove the lemon zest, then spread them across the base of your tart tin. Carefully pour the liquid chocolate mixture over the cherries. Pop your tart in the fridge for at least two hours to set. Finish with chopped almonds and serve with crème fraiche, if you like.


CF-Blogger-Badge-

DSC_0031

Courgette, Lime, & Coconut Cake

The courgette cake hasn’t yet taken off quite like the carrot cake. I’m not sure why. I think it’s a shame, really, because a good courgette cake is just as simple and delicious as a carrot cake. While the natural sweetness of carrots works wonderfully in desserts for obvious reasons, a courgette is a more neutral vegetable. The advantage of that is that it’s a great vehicle for all sorts of exciting flavours. Here, I’ve added lime and coconut to go for a kind of tropical vibe. Even though courgettes are possibly the least tropical vegetable ever.

I am good at looking after children and animals but, for some reason, totally useless at keeping plants alive. We don’t have a garden so I don’t have anywhere to practice. But really, that’s just an excuse: I’ve never been able to grow things anyway. I always get confused (too much water? not enough water? who knows?) and then forget about whatever plant I’m supposed to be tending to.

DSC_0014-1024x683

Luckily, we have plenty of lovely neighbours who are digging their way to victory, and occasionally we will receive donations of tasty home-grown vegetables. I say donations, but the neighbours from whom we got the magnificent courgettes that went into this cake were practically begging us to take them off their hands. They seemed slightly panicked about the sheet volume of courgette they had managed to produce. One of them was the size of my arm.

So anyway, obviously if you have an abundance of courgettes you could put them in a stir-fry, or on a savoury tart, or make courgette fritters. Or, you could add a load of sugar and make a courgette cake. I bet you can guess which direction I went in.

DSC_0046-1024x683

Source:

Adapted from this recipe.

Notes:

I think this recipe would also work brilliantly well with lemon or orange, if you have them lying around. Or if you don’t like lime, I guess? I don’t think I have ever met anyone who doesn’t like lime though.

If you want a quicker or more simple courgette cake, you can leave all the stuff at the end and have it unadorned. It’s really easy though, and I promise it only takes five minutes.

Ingredients:

for the cake

350g courgettes, unpeeled
150g soft brown sugar (or any brown sugar, or coconut sugar if you have it)
50g desiccated coconut
125ml sunflower oil, or other neutral oil such as vegetable or corn
3 large eggs
zest of 2 limes
100g sultanas, or raisins if you prefer
300g self raising flour
1 tsp baking powder

for icing and finishing

100g icing sugar
juice  and zest of 1 lime
handful of desiccated coconut

Method:

  1. Preheat your oven 180C/160C fan/gas 4, and lightly grease a large non-stick loaf tin. Grate your courgette, then pop it in a sieve and try to push and squeeze as much liquid as possible out of it, to stop your cake going soggy.
  2. Pop your courgette in a large bowl, then add your sugar, coconut, oil, eggs, lime zest, and sultanas, then give it all a good mix. Add your flour and baking powder, then quickly stir until just combined. Pour your mixture into your loaf tin, then bake for around 40-50 minutes, or until the cake is firm and well risen, and passes the skewer test.
  3. Mix your icing sugar with enough lime juice to make a thick icing. Let your cake cool, then zigzag it with your lime icing, and finish with a sprinkling of the lime zest and a bit more desiccated coconut.
DSC_0062-1

Spinach, Artichoke, & Blue Cheese Galette

Ever really wanted some pie, considered making one, and then thought it was too much effort and fallen asleep on the sofa instead? Enter: the galette.

A galette will bring you the joy and happiness associated with eating pie, but with none of that ‘finding the right tin’ and ‘making sure the pastry doesn’t tear’ and ‘blind baking’ stuff that all seems like a bit of an effort. It’s free form. It’s rustic. You don’t even need a dish or a tin –  a flat baking tray will do the job admirably.

DSC_0050-2-1024x683

What you get is delicious, crisp, more-ish pastry, cuddling up informally with the filling of your choice. Here, I’ve gone savoury, with this spinach, artichoke, and blue cheese number. But you can use any pie filling you like (including sweet ones, if you omit the herbs and spices from the pastry), and still enjoy a delicious pie-like treat.

The best thing is that a galette is meant to look rustic. The pastry is inherently cracked and folded. You don’t need to worry about perfect pastry technique. If you’re nervous about rolling and shaping pastry, the galette is your friend. And it looks appealing and impressive enough to be pretty fancy, if that’s what you’re looking for. But it’s also easy enough to just be dinner. A really tasty dinner. I’m going to go and snack on some galette now.

DSC_0074-1024x683

Source:

Pretty liberally adapted from this recipe.

Notes:

You may be wondering about the grated mozzarella. I would normally always go for a ball of mozzarella, rather than grated, but for this (and pizza toppings, incidentally), grated tends to work best because it’s not too wet, and is easy to distribute through fillings. That said, if you have whole mozzarella you’d rather use, that’ll be okay too if you shred it finely.

Ingredients:

for the pastry
150g plain flour
150g wholemeal flour
½ tsp salt
1 tsp pepper
1-2 tsp very finely chopped fresh thyme
175g cold butter, cut into cubes
1 large egg yolk
2-4 tbsp cold water (start with 2)

for the filling
300g fresh spinach
Glug of olive oil
3 large cloves of garlic, crushed
Generous pinch of cayenne
Juice of ½ lemon
300g artichoke hearts, drained, any huge pieces cut in half (from a tin or a jar is fine)
115g grated mozzarella (see note)
Salt and pepper
80-120g blue cheese, broken into chunks (choose the amount according to how much you like blue cheese/how much you have lying around)
Handful of walnuts
1 egg, beaten
Handful of fresh basil leaves, to garnish

Method:

  1. Pop a small bowl of cold water in the fridge. Put both flours, salt, pepper, and chopped thyme in the food processor. Blitz briefly to combine. Add the cubed butter and pulse until everything is combined and looks like breadcrumbs. Add the egg yolk and two tablespoons of your fridge-cold water, and pulse again. If it’s starting to come together and looks like pastry, you’re done. If it still looks dry, add another tablespoon or two of cold water until it just comes together. Tip your pastry onto cling film, knead briefly to bring it to a disc shape, then wrap in the cling film and chill in the fridge while you make the filling.
  2. Heat your largest frying pan over a medium heat, add the spinach and cook until wilted, then keep cooking for a couple of minutes to drive some of the moisture off – you might have to do it in batches depending on the size of your pan. Tip the spinach into a sieve and get rid of as much excess liquid as you can – don’t be too precious about it, though, because you can spend your whole life trying to get liquid out of spinach.
  3. Put the spinach back in the pan and add the olive oil and the garlic. Cook the spinach with the garlic gently until it starts to smell tasty – 2 or 3 minutes. Take the pan off the heat and add the cayenne, lemon juice, artichokes, grated mozzarella, salt, and pepper, then leave the filling to cool – pop it in the fridge if you’re in a hurry.
  4. When your filling is cool, take your pastry out of the fridge. Flour your work surface and roll the dough to about the thickness of a £1 coin – aim for a circle-ish shape, but it doesn’t really matter. Transfer your pastry to a baking tray lined with baking parchment. Leaving approximately a 7cm border around the edges of the pastry, top the dough with the spinach mix, then scatter on the blue cheese and walnuts.
  5. Fold the edge of the dough over the filling – don’t worry if it cracks a bit, you’re going for rustic. Brush the crust with the beaten egg. Place the galette in the fridge for 15 minutes, or until ready to bake – if you want to get ahead, you can leave it in the fridge for a few hours or overnight.
  6. Preheat oven to 200C/180C fan/gas 4. Bake the galette for 45-55 minutes, or until the crust is golden and crisp. Let it sit for five or ten minutes, then top with fresh basil, and serve.
DSC_0002

Black Quinoa & Halloumi Salad with Wild Honey

A recipe post with a difference, this week: this black quinoa salad was inspired by Wild Honey. Wild Honey are a fantastic independent Oxford business, selling fresh, local, and organic products. Run by Matt and Jessica, it’s all about the local community and economy, with a real focus on great suppliers. They mainly sell food and drink, but they also sell supplements and beauty products. Obviously for me though, it’s all about the food.

I’m going to be doing a few recipe posts inspired by ingredients from Wild Honey. There are two Wild Honey shops, and both are glorious treasure troves of delicious, intriguing products. Yes, you can buy excellent peaches and honey and chocolate and all sorts of the usual things there, but you can also find some lesser known delights on their shelves. It’s those products that I want to focus on. I’m going to develop a few recipes that should hopefully give people a few ideas on what you can do with some of their more unusual ingredients.

Hence, black quinoa. Yes yes, I know, this blog is usually all about the baked goods. But even I sometimes eat healthy stuff to break up the endless parade of cakes.

Green-Engagement-Mood-Board-Photo-Collage

Black quinoa is like the exciting older cousin of regular white quinoa. It’s darker, stronger in flavour, and has a more interesting crunchy texture. Like regular quinoa, it’s a complete protein, containing fibre, vitamin E, iron, phosphorous, magnesium and zinc. It’s also gluten free, low in fat, and high in protein.

There’s no need to be intimidated by black quinoa if you’re unfamiliar with it. It’s just as simple to cook as regular quinoa: rinse, simmer, drain if needed. Once it’s cooked, there are loads of things you can do with it. If you make up a big batch, it’s great to have throughout the week. It’s very versatile: you can have it in salads, with curries, topped with roasted vegetables…

Simple-Pastel-Grid-Photo-Mood-Board

This black quinoa salad also contains raw broccoli and kale. Wait, wait, don’t leave. I promise you, it’s really tasty. Especially when spiked with a creamy tahini dressing, and finished with shining pomegranate and crispy fried halloumi. You could also switch it up in a dozen different ways. It would work great with cauliflower instead of broccoli, and I think adding a handful of toasted nuts would also be an excellent idea. You could leave off the halloumi if you want, but… I mean, any excuse for halloumi.

DSC_0026-1024x683

I would really encourage you to pop to Wild Honey for black quinoa if you live in the Oxford area, or to another health food shop if not. You could also buy it online. It’s really beautiful in this salad, and more interesting than regular quinoa, with a lovely complex flavour. That said, this would also work perfectly well with white or red quinoa if that’s what you’ve got in the cupboard.

DSC_0038-683x1024

Notes:

I never, ever measure anything in cups normally. However, it does work easily here, because the quinoa : water ratio is volume based. You don’t need a special measuring cup or anything – just grab any old mug, fill it with quinoa, and that’s your measurement. You then need three times as much water as quinoa.

This salad feeds 4-6 people, depending on whether it’s a main or a side, and how hungry those people are.

Ingredients:

1 mug black quinoa
3 mugs water
1 head broccoli
1 handful/ ½ pack kale
generous pinch of sea salt, and a good grinding of pepper
juice of half a lemon
3 tbsp extra virgin olive oil

for the tahini dressing

100g tahini
75ml water
2 cloves garlic, crushed
juice of half a lemon

to finish

1 pack halloumi
handful of pomegranate seeds

Method:

  1. Put the quinoa in a sieve, and rinse well for a minute or so. Pop it in a saucepan with the water, bring to the boil with a pinch of salt, then simmer gently, stirring now and then, for around 25 minutes. Check it after 20 to see if it’s cooked – you’re looking for the grains to seem like they have popped open, showing a kernel, and to be largely soft but with a bit of texture and bite. If needed, drain it, but it will probably have absorbed all the water.
  2. While the quinoa is cooking, break the broccoli into rubble (i.e. the tiniest little florets possible) and pop it in a big bowl. Shred the kale, removing any tough stalks, and add it to the broccoli. Add a big pinch of salt, pepper, the lemon juice, and the olive oil. Mix everything together, and then get your hands in and massage it all for a minute or two, or until the kale shrinks, softens, and darkens.
  3. For the tahini dressing, mix all the ingredients together, taste, and season.
  4. Cut your halloumi into thick slices, then fry it in a non-stick frying pan for a couple of minutes per side in a little oil, until golden.
  5. Mix the cooked, drained quinoa into the broccoli and kale mixture. Pop it all into the dish you want to serve in, drizzle with the tahini dressing, sprinkle with the pomegranate seeds, and finish with the halloumi.
DSC_0006

Cherry & Coconut Chocolate Tiffin

Tiffin is one of those things that seems so simple it barely warrants a recipe. I mean, really, what am I telling you to do here? Crush some biscuit, mix it up with some other bits and pieces, and cover it in chocolate. Hurrah, you have tiffin. You don’t need me to tell you how to do that. You can definitely do it all by yourself.

That said, the reason you are getting a recipe for tiffin today anyway is because I’d forgotten how delicious it is. Sometimes I get wrapped up in things like messing around caramelising white chocolate, or developing an apricot, hazelnut, and cardamon cake. Which is all well and good. But it’s easy to forget the simple pleasures. Tiffin is definitely a simple pleasure. And yet, somehow, I haven’t made it for years.

DSC_0022-2-1024x683

I actually remember the last time I made it very well: it was when I lived in my old flat and had just gotten together with James. We had friends over, I’d made tiffin, and I went to get a bottle of wine out of the fridge and the the shelf on the fridge door somehow broke. A glass bottle of tonic water fell out and shattered over my arm, and I still have the scar from where they had to pull a bit of glass out at minor injuries. Maybe I have subconsciously been avoiding tiffin since, due to traumatic associations.

Tiffin is, incidentally, one of James‘s favourite things. He nods and smiles politely when I produce some towering, massively over the top cake, but given that his other favourite thing is rocky road, I think he’d  secretly be happiest if I just kept it simple.

DSC_0050-1-1024x683

Notes

Obviously you can make any number of adjustments to this. Dark chocolate on top? White chocolate on top? Swirly marbled chocolate on top? All fine. Prefer hazelnuts to pistachios? Got some raisins but no cherries? Think coconut is the devil’s work? Make your own adventure. This is just a tiffin combination that I happen to like. Rich tea biscuits, digestives, and gingernuts also make excellent bases here, in case you don’t like Hobnobs (you’re wrong though, by the way).

I have used an 18cm round cake tin here, purely because I felt like cutting the tiffin into wedges. You could also use a 20cm square tin if you’d prefer tiffin squares or bars. Finally, you could double the recipe very easily and use a large traybake tin or well-lined roasting tin to feed a bigger group.

Ingredients

120g butter
60g golden syrup
25g caster sugar
10g cocoa powder
225g Hobnobs/oat biscuits
70g dried cherries
50g pistachios, roughly chopped
50g dessicated coconut
200g milk chocolate

Method

  1. Line a non-stick 18cm (or thereabouts) cake tin with baking parchment. Melt the butter, golden syrup, caster sugar, and cocoa powder together in a large saucepan over a gentle heat.
  2. While they’re melting, roughly crush your biscuits (either by putting them in a sandwich bag and bashing them, or blitzing them in the food processor) until you have a mixture of fine crumbs and some fairly big chunks.
  3. When your syrup mixture has melted to a glossy dark liquid and the sugar has dissolved, take the pan off the heat. Mix in the crushed biscuits, then the cherries, pistachios, and coconut. Make sure everything is well combined.
  4. Spoon your mixture into your prepared cake tin and press it down in an even layer. Pop the tin in the fridge to chill while you melt the chocolate. Melt your chocolate either in the microwave on low heat or in a glass bowl over gently simmering water. Pour melted chocolate over the cooling base and give it all a shake so the chocolate is even, then put the whole thing back in the fridge to set for around 1 hour, or until the chocolate is firm.
  5. Cut, serve, try to resist eating whole thing at once by yourself.
DSC_0021-4

Caramelised White Chocolate & Hazelnut Cookies

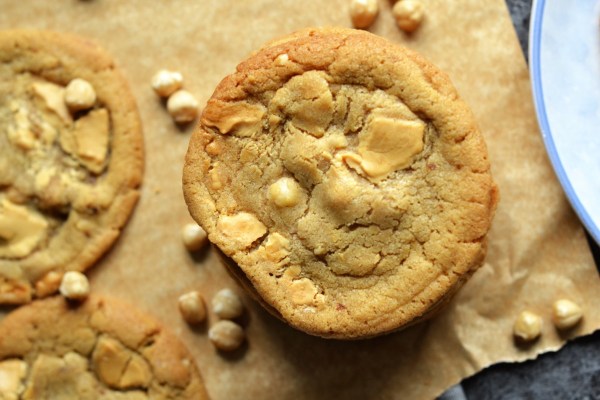
I was going to do a completely different recipe this week, but we’ve ended up with caramelised white chocolate and hazelnut cookies, slightly by accident. In last week’s Taste Test post, I mentioned caramelised white chocolate in passing. I got a surprising number of reactions, ranging from ‘I have never found a white chocolate I like so I am intrigued by your caramelised white chocolate and don’t believe it will change my opinion’, to ‘Please post a recipe for caramelised white chocolate. Please.’

Lots of people are very opposed to white chocolate, and I can see why. There’s the old argument that it’s not really chocolate, as it contains no cocoa solids, being made instead of cocoa butter, sugar, and milk solids. Poor quality white chocolate is often blandly sweet. I would argue, though, that good quality white chocolate certainly has its place, and when caramelised it becomes a true delight.

DSC_0001-1-683x1024

When caramelised, white chocolate progresses beyond bland sweetness, and develops a deeper, warmer flavour. It reminds me of caramel (well, duh) and peanut butter. If you start with a good quality white chocolate (I’d recommend at least 30% cocoa butter) with a hint of vanilla, then add a good pinch of sea salt before caramelising, you get a grown-up treat.

You can then do any number of things with your caramelised white chocolate. If you leave it in liquid form, it makes an excellent ganache, an enhancing icing ingredient, or the beginnings of an amazing ice cream. You can also do what I did here: let it set solid, then break it up into pieces. That way, you can put it into cookies, use it to decorate cakes, or (let’s be honest) just straight up eat it. I won’t tell.

DSC_0040-1-1024x683

This is a twist on a basic chocolate chip cookie recipe I posted on the site ages ago. The main point of this post is to tell you all that caramelised white chocolate is amazing, but this is also a really great base cookie recipe that definitely deserves your attention. If I can’t convince you to jump on the caramelised white chocolate bandwagon, you can always use other chocolate and make the cookies anyway.

Source:

The base cookie recipe here is minorly adapted from The Violet Bakery, by Claire Ptak.

Notes: 

This recipe will yield around 20 generously sized cookies. They will keep well in an air-tight container for three or four days. If you have more willpower than we do.

Caramelised white chocolate is very easy to make, but it does take a little time. This time is basically all passive though – you just need to let it do its thing and check in now and then.

Ingredients: 

for the caramelised white chocolate

200g good quality white chocolate (I actually caramelised 400g so that 200g could go into the cookies and 200g could be reserved for other purposes)
good pinch of sea salt

for the cookies

250g butter, softened
200g light brown sugar
100g caster sugar
1 tsp vanilla extract or, if you have it on hand, vanilla bean paste
3 large egg yolks
325g plain flour
1 tsp fine sea salt
1 tsp bicarbonate of soda
100g blanched, toasted hazelnuts, roughly chopped

Method – Caramelised White Chocolate

  1. First, caramelise your chocolate. Heat your oven to 140C/120C fan/gas 1. Break your chocolate into pieces if it’s in a block, put it on a (clean, dry) baking sheet with a rim, sprinkle it with a pinch of sea salt, then pop it in the oven for 10 minutes to melt. Take it out, smooth it and spread it around with a (clean, dry) spatula, then pop it back in the oven.
  2. Keep going for around 40-60 minutes, taking it out and stirring it around every 10 minutes or so to ensure it’s caramelising evenly. It might look like it’s going lumpy or chalky, but give it a stir and it’ll sort itself out. Everyone’s oven is different so I can’t say precisely how long you want to keep going for, but you’re aiming for a peanut butter kind of colour. Keep tasting it! Stop when you are happy. You can see in my video below how the chocolate thickens and darkens – I’ve taken this one pretty slowly on a low oven, but you can push it a little faster if you’re confident.
  3. If you get to the end of the process and your chocolate has lumps you’re not happy with (more likely if you are using a chocolate with a low cocoa butter percentage) just pop it in a blender and give it a quick whizz with a teaspoon or two of flavourless oil. Never add water! If you want the chocolate solid, spread it out on baking parchment or silicone on a cool tray and leave it to set, or pop it in the fridge if you’re impatient.

Method – Cookies

  1. For the cookies, line a baking tray which will fit in your freezer with parchment paper. In your largest bowl or in a stand-mixer, beat the butter and both types of sugar together until just combined and even, then beat in the vanilla and egg yolks – all at once is fine. Add your flour, salt, and bicarbonate, then mix to form a stir, firm dough. Finally, fold in your hazelnuts, then break your white chocolate into rough pieces and fold them in too. I like to reserve a few pieces and press one into the top of each cookie.
  2. Using a small ice cream scoop, scoop the dough into cookies and pop them on your lined tray. You’ll have fairly large scoops of dough – mine were around 45g. Freeze for an hour, or up to a month.
  3. Heat your oven to 180C/ 160C fan/ gas 4, and take the cookies out of the freezer. Spread the frozen dough between three or four lined baking trays – you need to give them a lot of space to expand. Let them rest at room temperature for five to ten minutes while the oven heats up, and then pop them in. Bake for 15-20 minutes (it was 16 in my oven), until the outsides of the cookies are baked and crispy, but the insides still feel soft and underbaked. Let them rest on the counter to firm up for at least 10 minutes.
DSC_0101

Popcorn Brownies

Ah, popcorn brownies. An odd thing for someone who is not a big popcorn fan to make. I was inspired by the Paul A. Young class that my mother and I attended. What we ate that day is somewhat of a glorious chocolate-y blur, but it included a popcorn chocolate so delicious that my mother ended up ordering some to be sent directly to her door. And when I say ‘some’, I think she got about eight bars.

DSC_0074-1024x683

So, while I am not a real lover of popcorn in its purest form (it’s fine, it’s just a bit… meh), I liked the idea of it in chocolate. The concept of a salty crunch in a brownie appealed to me. Unsurprisingly, because, well, brownies. Brownies and I, we have previous, you know?

As always, I couldn’t resist gilding the lily. I felt like the brownies needed one more element. I couldn’t work out what it might be for a while, until I was searching for marmalade in the cupboard (ooh, marmalade brownies! Now there’s an idea…) and came across a jar of biscuit spread. I just about managed to stop myself from eating the entire jar of biscuit spread with a spoon, and instead used it in a brownie recipe. For you guys. Because I’m kind like that.

DSC_0098-1-1024x683

I took these brownies to a friend’s house after I’d finished photographing them, and everyone there assured me that they are a winner. So I can recommend this (perhaps slightly odd) combination of ingredients with confidence. They’re chocolatey. They have a salty popcorn crunch. And they’ve got caramelised biscuit spread on top. You can’t lose, really.

DSC_0126-683x1024

Notes:

If you have never tried Lotus Biscuit Spread then… well, maybe save yourself and avoid it, because that stuff is addictive. It’s really, really good here, and you can get it at large supermarkets. If you don’t want to use it, or can’t find it, then you can substitute home-made or shop-bought salted caramel. You could also stud the top of the brownies with chocolate chunks, or leave them as popcorn-only brownies. But really, the biscuit spread is delicious.

I used salty popcorn here because I didn’t want the brownies to be overly sweet, but of course you can use whatever weird and wonderful popcorn you like.

Ingredients:

200g good quality 70% dark chocolate
140g butter
2 large eggs, plus 1 extra yolk
225g golden caster sugar
100g plain flour
1 tsp salt
15g salted popped popcorn, crushed into small pieces (I put it in a sandwich bag and bashed it)
150g Lotus Biscuit Spread

Method:

  1. Break your chocolate into pieces, chop your butter into rough cubes and place them both in a glass or metal bowl over a pan of gently simmering water and leave them to melt, stirring occasionally. Preheat your oven to 180C/160C fan/gas 4. Grease and line a 20x20cm square tin.
  2. While your chocolate and butter melt, mix your eggs with your extra yolk, and weigh out your sugar. When your chocolate and butter have completely melted, beat in your sugar (I use an electric hand whisk), followed by your eggs. Add your flour and salt to the mixture and beat that in too. Stir through your crushed popcorn
  3. Pour the mixture into the tin, smooth the surface, and then dollop your biscuit spread, if using, on top of the batter and swirl it around with a knife or skewer. Bake for around 25 mins – remember brownies will firm up as they cool.
  4. If you need to slice these neatly or take them anywhere then let them chill and firm in the fridge for a couple of hours first. They are also delicious eaten warm and gooey from the oven.


popcorn_brownies_pinterest-342x1024

DSC_0021-1

Apricot, Hazelnut, & Dark Chocolate Cake

This apricot, hazelnut, and dark chocolate cake was one of the very first cakes I made for local literary event Short Stories Aloud, which means I must have been making it for a few years now. Which is frightening, because I feel like I only discovered it a couple of months ago. Time seems like it’s rushing by in disconcertingly huge dollops these days.

The joy (well, one of many joys) of Stories Aloud is that if you bring a cake then you get in for free. This almost feels like cheating to me, because I bring cake pretty much everywhere, whether or not it is wanted, so being given entry to an event in return feels pretty jammy, not going to lie. This is typical of the Stories Aloud mentality though. It’s an event quite unlike any other that I’ve attended, full of intelligent, warm, generous, funny people. It helps that it was founded by the wonderful Sarah Franklin, who is a totally top human being. Making cake for them each month has forced me to get my act together and produce something on more than one occasion. Everyone is always unfailingly polite and appreciative of my efforts.

DSC_0031-683x1024

This cake certainly didn’t look quite like this when I first started making it though. I fiddled and embellished and mucked around and was inspired by a Victoria sponge (which was also made for Stories Aloud, funnily enough). Now, suddenly, we’re at this odd hybrid of a cake. It’s studded with rich dark chocolate and sharp, fresh apricots, and stuffed with toasty chunks of hazelnut to give it a bit of satisfying crunch. We’re in apricot season round these parts and my are they glorious. Apricots are one of my favourite fruits when you catch them at their best.

This cake is simple enough to whip up with relative ease, but probably pretty enough for a birthday or a special gathering if you cover it in a loads of miscellaneous bits and pieces, like I did. It is robust, and keeps well, and is unusual enough to be a nice change from a standard recipe, if you’re into that sort of thing.

In short, I would thoroughly recommend it.

DSC_0050-1-1024x683

Source:

Adapted from the chocolate, pistachio, and apricot cake in Anne Shooter’s excellent Sesame & Spice.

Notes:

Obviously I have covered this cake in all manner of stuff, because I am in the habit of gilding the lily. Here, the cake is topped with buttercream, raspberries, apricot slices, pomegranate seeds, chopped hazelnuts, and edible flowers. Related: they have started selling edible flowers in Sainsbury’s! I am overjoyed about this. If I need a large or specialist order of edible blooms then I buy from Maddocks Farm Organics, but only for special occasions. Since I don’t have a garden and can’t grow anything myself, I am very pleased that I can get edible flowers cheaply and easily at Sainsbury’s for more casual cake-decorating needs.

Anyway, do of course feel free to skip all this rubbish and simply leave the top of the cake plain, or dust it with some icing sugar. It will still be delicious. I’m just a crazy person.

Ingredients:

200g dark chocolate (I used Lindt 70%)
100g whole blanched and toasted hazelnuts (or take the skins off yourself, if you prefer, but who has time for that really?)
150g softened butter
150g golden caster sugar
around 10-15 cardamom pods
3 eggs
150g plain flour
1 tsp sea salt
1 tsp baking powder
5 ripe apricots, stoned and diced

for the filling

100g softened butter
250g icing sugar
1/2 jar of apricot jam

Method:

  1. Heat your oven to 180C/160C fan/ gas 4. Grease and line two 18cm (or thereabouts) cake tins. Either blitz your chocolate and nuts in a food processor until they are rubble, or chop them together fairly finely.
  2. I do this next stage in a Kitchen Aid, but it would be fine with a hand whisk or simply a wooden spoon if you prefer. Cream the butter and sugar until light and fluffy. Crack open your cardamom pods in a pestle and mortar, then remove the seeds and grind them until fairly fine. Beat the cardamom into butter and sugar. Beat your eggs together then add them gradually to the butter and sugar mix, beating all the while. Finally, beat in your flour, salt, and baking powder, then fold in your diced apricots, chocolate, and nuts.
  3. Divide the mixture as evenly as you can between your two tins, then bake for 30-35 minutes, or until firm and passing the skewer test. Let your cakes cool completely while you make your filling.
  4. For the filling, beat the butter until very soft, then gradually beat in the icing sugar until you have a smooth, fluffy buttercream. Beat in 2 tbsp of the apricot jam (or more, to taste). When your cakes are totally cold, cover one with remaining apricot jam, then either pipe buttercream on top of the jam or simply spread it onto the other cake and sandwich them together. Leave plain, or decorate however you like with fruits and nuts.
DSC_0017-Copy

Goats’ Cheese Stuffed Chicken with Bacon and Thyme

Full disclosure: it took me ages to come up with a proper name for this recipe, because at home we call it ‘chicken-y bacon-y goats’ cheese-y thing’. At least once a month, when I’m stuck for any original ideas regarding what to make for dinner, I will turn to James and say ‘Chicken-y bacon-y goats’ cheese-y thing?’ and he’ll say ‘Works for me’, and that will be that. I have stated before that I think chicken and goats’ cheese make excellent bedfellows. Also: goat cheese; goat’s cheese; goats’ cheese. I go with the latter because I think it denotes milk from multiple goats, which seems to make the most sense, but who knows? Also, well done if you got to the end of this paragraph without falling asleep.

DSC_0006-Copy-1024x683

I have been making this recipe, or some variation of it, for years. There are lots of versions of ‘chicken breast stuffed with some sort of cheese and wrapped in some sort of meat’ recipes on the internet, so this certainly isn’t an original concept, but this is how I make it.

James and I are by no means vegetarians, but we’ve been eating less meat recently, having it as a treat rather than a staple of every meal. This means a recipe like this is now something of a luxury, rather than a standard weeknight dinner, and it’s made me rather fond of it – hence it suddenly popping up on this blog.

DSC_0035-Copy-1024x683

You may think that stuffing chicken with something and wrapping it in something else seems like kind of a tricky faff, but it’s far easier than it perhaps sounds and it only takes ten minutes to put together. I am kind of lazy about this sort of thing and I don’t find it too onerous. The chicken also goes well with most grains, potatoes, salads, and greens, so it’s pretty versatile in that you can serve it with whatever you have knocking about.

DSC_0057-Copy-683x1024

Notes:  This recipe will feed four, assuming you make a side dish, or you can do what James and I often do and eat two pieces of chicken for dinner and have the other two the next day. Also, all quantities are easily halved.

The side dish in the pictures is a lentil salad type deal that I often make. It is very, very simple so I haven’t included the recipe, but let me know if you have a desperate yearning to know what is in it.

Ingredients:

4 garlic cloves
handful fresh thyme
handful of tomatoes (optional)
4 chicken breasts
200g soft goats’ cheese
1 pack streaky bacon
pepper
olive oil

Method:

  1. Preheat oven to 210C/190C fan/gas 5. Grab some sort of roasting dish or tray. Roughly chop your thyme, crush your garlic, and set both aside. If you’re using tomatoes, cut them in half or into quarters (depending on size) and chuck them in your roasting tray.
  2. Lay your chicken breasts flat, and cut a slit into the side of each, trying not to cut them in half completely. Cram about a quarter of your goats’ cheese into each chicken breast, then wrap each up tightly in streaky bacon – you need about three rashers for each. Lay them in your tray, directly on top of the tomatoes if using.
  3. Rub each piece of chicken with crushed garlic, and sprinkle with thyme. Season with plenty of pepper – you can use a little salt too if you like but I usually don’t, because bacon is inherently salty. Drizzle the whole thing with a little olive oil, then bake for 25-30 minutes until the meat is cooked through, the bacon is crispy, and the garlic is golden. Serve with a drizzle of the juices from the pan.
DSC_0159

Blackberry and Pistachio Frozen Yoghurt

I know, I know, I used blackberry and pistachio together in a recipe last month. And I also put pistachios in pretty much absolutely everything. I’ve mentioned before that I go through food obsessions and phases, and poor James has to put up with eating the same things over and over until I get bored and move onto something else. Basically, purple and green is just where it’s at with me right now, I’m afraid, so that’s what you get. Frozen yoghurt.

I never picked fruit as a child, living mainly in London and lacking that sort of bucolic rural upbringing, and so it never really occurred to me to do so as an adult until recently. A couple of summers ago, I was walking the dog of a dear friend who was temporarily immobile, post-surgery, and stumbled across the most incredible treasure-trove of untouched, heavy-ripe blackberries, just across the river from where our boat is moored.

It was part of our neighbouring nature reserve, and the plants had grown so high and wild that they’d formed winding paths through the field down to the river, each lined with dripping, plump fruit. We’re not in blackberry season yet – although it’s been so warm that perhaps it will come early this year – but when the time is right I am going to find my way back there again and gather a few tubs of berries to freeze for the colder months. Frozen yoghurt is only one of a thousand things to do with them.

Of course, you can buy perfectly lovely frozen fruit from the supermarket, but it makes me feel outdoorsy and practical to try and pick it myself occasionally. In reality, I am the least outdoorsy person you are likely to ever meet.

DSC_0184-1024x683

Anyway, we had what passes for a heat-wave in these parts last week (three full days of heat, anyone in an actual hot country is laughing at us right now), and all we really wanted to eat was ice cream. But I don’t have an ice cream maker. And I’m kind of too impatient for all that setting, stirring, setting thing you have to do with a no-churn recipe. So instead, I give you frozen yoghurt. It’s an incredibly simple recipe (as was last week’s actually – clearly I am getting lazy). It’s healthy-ish. But also nice, promise. You could legitimately have this for breakfast. I did have this for breakfast.

DSC_0179-1-1024x683

Notes:

Obviously, you can make this with just about anything you like. I think raspberry and almond or blueberry and pecan would also be delicious, but hey, throw whatever you’ve got in the cupboards or the freezer in there and go wild. You could also stir through chocolate chips, crumbled biscuit, fudge pieces, cereal… That’s the beauty of frozen yoghurt. It’s adaptable.

Ingredients:

300g frozen blackberries
50g pistachios
200g Greek yoghurt (I like the proper, thick, full fat stuff, but whatever you prefer will be fine)
2-4 tbsp honey (adjust to taste)

Method:

  1. Either get your blackberries out of the freezer ten minutes before you want to make this, or whack them in the microwave for 30 seconds or a minute to soften them up – some blenders (mine included) will struggle with absolutely rock hard frozen fruit. Pop your pistachios in a dry pan on a medium heat to toast for around 5 minutes – keep shaking them around now and then to make sure they don’t burn.
  2. Put your blackberries, yoghurt, and honey in a blender and blitz until smooth and thick. Taste, adjust honey if needed.
  3. Chop your pistachios roughly and serve the frozen yoghurt sprinkled with chopped nuts, and some whole blackberries if you like.