DSC_0032

Tomato Bruschetta

A quick post today, for a very simple recipe. Tomatoes on toast. Yes, really. But believe me, this is much more delicious than I am making it sound. I have even fed it to people who don’t like tomatoes, and they’ve asked me for more. Tomato bruschetta might not be an original idea but, when they’re done right, sometimes you just can’t beat the classics.

DSC_0002-1-1024x683

The choice of bread is crucial here. You may be tempted to go for a sourdough or a baguette, but I’d advise against anything too crusty. You don’t want to have to be pulling and tearing to get a mouthful, and end up with a heap of tomato bruschetta in your lap. Instead you want a pillowy, yielding bread, ideally fried gloriously golden to give it a perfect crispy exterior and a soft, warm interior. Something simple. If I’ve got the time, I do make my own bread for this, but a decent sandwich bread will do you fine. Buy it whole and slice it generously.

DSC_0052-1024x683

This recipe is all about using simple ingredients that work well together, and letting them do the heavy lifting for you. My kind of cooking.

Source:

This is my version of something we used to make at the cookery school, and since it’s Italian, I am assuming it came from the lovely Amelia Earl. She’s setting up a beautiful cookery school and bed and breakfast in Yorkshire, which you should definitely check out if you’re at all into food, gorgeous scenery, or nice people.

Notes:

Don’t worry too much about weights and measures here. This tomato bruschetta will work perfectly well even if you’re not too precious about quantities. Just taste as you go along to make sure you’re happy.

If you have leftover tomato mixture after making this recipe, then you can pop it in the fridge and keep it for a couple of weeks, using as needed. It’s great on pizza or pasta too.

DSC_0035-1-1024x683

Ingredients:

Around 1.5kg of fresh tomatoes, of any shape or size
A bunch of fresh basil leaves
Plenty of extra virgin olive oil
Salt and pepper
Balsamic vinegar (the good stuff, not balsamic glaze or dressing)
3 fat cloves of garlic, 2 crushed and 1 whole
A knob of butter
A loaf of the bread of your choice (see above for details)
A ball of mozzarella

Method:

  1. Chop your tomatoes any old how (large chunks are fine) and put them in your largest saucepan. Add a handful of picked fresh basil leaves, reserving some for later, a generous glug of olive oil, plenty of salt and pepper, a drizzle of balsamic vinegar, and two of the garlic cloves (crushed). Mix everything together and leave it to sit for half an hour (or longer, if you prefer).
  2. Put your tomato mixture on a medium heat on the hob, and boil until reduced. Stir it occasionally to stop it catching on the bottom of the pan. How long this takes depends on how rich you’d like your tomato topping, how big your pan is, how high your heat is, and how many tomatoes you have. Personally, I cook mine for about an hour until I have a thick, rich, fragrant tomato base that is like the consistency of a tomato jam.
  3. Slice your bread into handy bitesize pieces. Heat a good glug of olive oil and a knob of butter in a large frying pan until foaming, then fry your bread, turning occasionally, until crisp and golden. Try not to let the butter burn. When the bread is fried, drain it on kitchen paper, then cut your remaining clove of garlic in half and rub both sides of the bread with the cut side of your garlic.
  4. Top each piece of bread with a generous dollop of the tomato mix, then finish with a torn piece of mozzarella and a basil leaf.

DSC_0024-683x1024

DSC_0068

The Bake Off Bake Along: Chocolate Peanut Butter Fondants

Ah, pudding week. Always a great time for the bake off bake along, particularly as we come into autumn. The temperature outside is dropping, and staying inside with a fluffy blanket and a selection of puddings seems only right and proper. I am a big fan of the steamed pudding, and I was all set to make one of those. Until the technical challenge came along. And it was chocolate fondants. Or molten chocolate cakes, or whatever Paul is calling them these days. (We’re not even going to talk about the showstopper, obviously).

Anyway, I wasn’t going to pass up the chance to make a chocolate fondant. They are one of my absolute favourite things. And filled with peanut butter? Does life get any better? Don’t answer that. If sitting cross-legged on the living room floor in my pajamas eating chocolate fondant for breakfast at 9am on a Sunday morning is wrong, then I don’t want to be right.

DSC_0066-1024x683

I’m becoming pretty attached to this year’s crop of bakers now. Sophie is adventurous and awesome. She was in the Army and she’s training to be a stuntwoman! Who wouldn’t want to be friends with her? Liam is adorable and funny, and I’m always rooting for him to do well. I adore Julia and I love the unique perspective she brings to things, having been raised in Russia. Yan’s flavours always sound great and I really admire her scientific approach to everything. James seemed like a lovely guy, and I was sad to see him go, but it did feel like his time.

DSC_0095-1024x683

But on to chocolate fondants and the bake off bake along. Sometimes people make a big fuss about chocolate fondants being difficult (especially on MasterChef), but really, they’re just undercooked chocolate cakes. As long as you’ve got a good recipe and you know your oven, you’re golden.

On the show, they made their cakes with peanut butter centres, which I am all for. Chocolate and peanut butter are a winning combination. However, I also had some salted caramel left from last week, so I thought I’d do half the fondants with peanut butter and half with salted caramel. I did not regret this decision. I also added some simple berries to bring a bit of contrast and sharpness to the dessert.

Happy, happy days, my friends. Happy days. It’s times like this when I love the bake off bake along.

DSC_0109-1024x720

Source:

My favourite recipe for these is from the great Nigella, and I’ve not changed a great deal because her ratios are perfect.

Notes:

You can skip the contrasting centres and the berries if you like, but both are excellent if you have them lying around

You will need 6 individual pudding moulds, or darioles, for this recipe. It’s really not a tricky thing to bake, but I appreciate that not everyone has darioles. Sadly, I don’t think normal ramekins would work for this, because they’re not as deep, so the puddings would be likely to cook through and you wouldn’t get the molten centre. Darioles aren’t expensive though, if you’d like to have a go at this recipe and you don’t have any to hand…

You can also serve these with cream or ice cream, but honestly, with the liquid centres I don’t think you need anything extra.

This recipe makes six individual puddings. If you don’t need six at once, keep the spares in the fridge until you want to eat them, and cook when you’re ready.

DSC_0118-1024x683

Ingredients:

350 grams good dark chocolate (I like Green & Black’s 70% for this)
50 grams soft butter (plus more for greasing)
cocoa powder, for dusting
150 grams caster sugar
4 large eggs (beaten with pinch of salt)
1 tsp vanilla extract
50 grams Italian 00 flour if you have it, or plain is fine if you don’t (I have tried both and prefer the texture from pasta flour)
6 tsp smooth peanut butter or salted caramel (or both!)
a handful of fresh or frozen mixed berries

Method:

  1. Pop your chocolate in a glass bowl over a pan of simmering water to melt, and stir it occasionally. Preheat your oven to 200C/180C fan/gas 6 and pop a baking sheet in there to heat up (unless you are cooking the puddings later). Butter your six darioles, line the base of each with a little circle of baking paper, then dust them with cocoa powder and tap out the excess.
  2. When your chocolate has melted, take the bowl off the heat to cool a little. In another bowl, cream together your butter and sugar until well-combined. Gradually beat in your eggs and salt, and then your vanilla. Sprinkle the flour over the batter, and then mix again until well combined. Add your melted chocolate, then mix again until well combined and smooth – you should have a fairly thin, glossy batter.
  3. Divide two thirds of the batter between your six darioles, until they’re each around two thirds full, then add a generous teaspoon of peanut butter (or salted caramel) to each. Divide the remainder of the batter between your darioles, covering the filling, and smooth the tops.
  4. If you’re cooking them later, pop your moulds into the fridge until needed. If you’re cooking right away, pop them in the oven for 10 minutes (12 if cooking from the fridge). If you’re serving with frozen berries, just microwave them for one minute until they’re warm and releasing their juices. To serve, turn each pudding out onto a plate, top with a spoonful of berries, and eat immediately.
DSC_0034-1

Gluten Free Carrot Cake Muffins with Indigo Herbs

Now, we all know that my favourite kind of cake is chocolate cake. But all types of cake are welcome here! I also have a lot of time for a good carrot cake. Carrot cake is a flavourful, comforting, pleasing option from the cake world, and I am always happy to see one. Here, we have carrot cake with a difference. This week, I am working with Indigo Herbs, who sell not just herbs but a wide range of high quality, organic, natural health products. With some fantastic ingredients from their online shop, I’ve created these gluten free carrot cake muffins.

DSC_0026-1-1024x683

DSC_0060-1024x683

These muffins are really simple to put together. You don’t need any special equipment, or any complicated baking skills. The muffins keep well, and are very portable. Packed full of carrots, walnuts, and dates, they’re great for an energy boost, and even a pretty legitimate breakfast choice.

DSC_0087-1024x683

Using walnut flour and coconut flour here means the muffins are gluten free, but also means they have a delicious and complex flavour. You can, of course, use regular gluten free flour, but if you’ve never worked with walnut or coconut flour before then this is a great easy introduction to these ingredients.

Similarly, you don’t have to use coconut sugar here, but it’s got a lovely coconut scent and flavour and a tempting, caramel-like colour.

DSC_0120-683x1024

Notes:

If you don’t need to make these muffins gluten free, or don’t have some of the more unusual baking ingredients listed here, then I’ve included alternative options.

I use tulip muffin cases for absolutely no reason other than I like the look of them. Standard muffin cases will work just as well.

The icing can certainly be skipped, if you prefer. It’s lovely with the muffins, but not essential if you’re trying to keep the sugar quantities down.

Ingredients:

140g unsalted butter, softened, plus extra for greasing
175g coconut sugar (or caster sugar)
250g carrots, grated
100g chopped dates
100g walnut flour and 100g coconut flour (or 200g gluten free self raising flour)
1 tsp cinnamon
1 tsp baking powder (gluten free if necessary)
3 eggs, beaten
50g walnuts, chopped
100g icing sugar
juice of 1 lemon

Method:

  1. Heat your oven to 180C/ 160C fan/ gas 4. Line a 12 hole muffin tin with paper cases. In a large bowl, beat your butter and sugar together until creamy and well-combined. Stir in your grated carrots and chopped dates.
  2. In another bowl, combine your flour(s), cinnamon, and baking powder. Begin to add your eggs to your carrot mixture, a little at a time, alternating with spoonfuls of the flour mixture, until everything is mixed together. Finally, mix in your walnuts.
  3. Divide your mixture evenly between your 12 muffin cases. Bake for 15-18 minutes, or until firm and starting to turn golden. While they bake, pop your icing sugar (if using) in a large bowl and slowly drizzle in the lemon juice, mixing with a whisk or a fork, until you have a smooth, fairly thick but pourable icing – you might not need all of the lemon juice.
  4. Let your muffins cool for 5-10 minutes, then drizzle with the icing.
Disclaimer: I was kindly given the products from Indigo Herbs used in this recipe as a gift, but all opinions are my own.
DSC_0019

The Bake Off Bake Along: Chocolate & Pistachio Caramel Cake

I was embarrassingly excited about caramel week from the moment I heard of its existence. ‘Now that’, I thought, ‘is going to be a fun bake off bake along week’. I mean, who doesn’t love caramel? People who are wrong, that’s who.

Stroopwafels are one of my favourite things ever… but I don’t have a waffle iron. I was very torn. There was a serious moment when I considered buying one (I got to the ‘looking up prices on Amazon’ stage), but it seems a bit too insane and profligate to buy an expensive bit of kit just for the sake of making one bake off bake along technical challenge. Even on caramel week.

Realistically I would never use it again, and in my teeny tiny kitchen every single bit of kit has to be there for a good reason. It’s a bit rubbish, actually, for them to set a technical challenge that requires an obscure bit of equipment, so people at home generally can’t join in. Also, considering that every single person messed up the stroopwafel caramel, I reckon they were either given insufficient instructions or insufficient time. I mean, if half of them messed it up then fine – but all of them?

DSC_0004-2-1024x683

So, down to a choice of two things. I absolutely love a millionaire’s shortbread, but since I have done the signature challenge every single week for the bake off bake along so far, I thought this was perhaps my one chance to give a showstopper a go. You know, when it wasn’t something insane, like a biscuit board game or a bread sculpture. A caramel cake seems pretty reasonable. I make stupid huge cakes fairly often.

It felt like cursing myself to think this, but I have never been particularly scared by the concept of making caramel. One of the things I bake most often is salted caramel brownies, so I make caramel for those all the time. And it hasn’t gone wrong yet. Cue targeted lightning strike from the heavens directed at my kitchen and everything blowing up.

DSC_0048-2-700x1024

It was actually fine. But I did cheat slightly in that I didn’t use a spun sugar decoration. I’ve done spun sugar at culinary school, and I love playing with it, but… well, to be honest, it’s an absolute and total pain cleaning up little bits of spun sugar when they are scattered and hardened all over your kitchen, and now that I’m working full time I have to cram these bake along sessions into sneaky little grabbed hours.

So here we have it: a chocolate brownie and pistachio cake, sandwiched with a salted caramel layer and a pistachio buttercream, decorated with raspberries, homemade honeycomb, and pistachio caramel shards. It’s not the prettiest thing ever. It’s fairly messy, and I was rushing. But it was tasty. And it has caramel, chocolate, and pistachio. And those are three of my favourite things.

DSC_0055-1024x683

So where’s the recipe?

This might be a bit of a cop out, but I’m not sharing the recipe, because it would be incredibly long and complicated. Two different types of cake, salted caramel, pistachio buttercream, honeycomb, pistachio shards… I am assuming no one is going to be casually making this! Do let me know in the comments if you’re particularly after the recipe for any of the elements of the cake and I will happily provide it.

Another week, another bake off bake along done, and enough caramel made to use up all the white sugar in my baking cupboard. And there was a really serious amount of sugar in my baking cupboard.

The story so far: bake along one, two, and three

DSC_0005

Spelt Spaghetti and Red Pesto with Wild Honey

I am a great believer in the power of a pasta dish. Sometimes there is nothing you want more than a simple, comforting bowl of steaming pasta, with a cracking sauce to make the meal sing. With great ingredients, an easy dish doesn’t have to be boring. With pasta, though, it’s natural to fall into the pattern of making the old favourites over and over again. I love spaghetti bolognese and standard pesto pasta as much as the next person (okay, more than the next person), but sometimes you fancy something a bit different. I’ve teamed up with Wild Honey again – they’re a fantastic local independent health food shop here in Oxford – to bring you a new recipe. This spelt spaghetti and red pesto is made using some ingredients from their bountiful shelves.

DSC_0004-1024x683

Why spelt spaghetti? Well, of course, normal spaghetti is delicious. For a step up and a bit of a change, though, spelt spaghetti is an excellent choice. Spelt is an ancient grain, with a delicious, nutty flavour. Spelt pasta tends to sit lighter on the stomach than standard wheat pasta, because it’s wheat free (but not gluten free) and high in fibre, so most people find it easier to digest. All in all, it’s a great option, and it goes wonderfully well with this pesto. You can find it at Wild Honey, along with the walnuts I have used to make the pesto, and lots of other goodies.

DSC_0042-1024x683

This spelt spaghetti and red pesto is the second in my series of recipe collaborations with Wild Honey. If you’d like to see the first recipe, a black quinoa and halloumi salad, head on over here.

Notes:

Although spelt spaghetti is no more difficult to cook than regular spaghetti, is it pretty easy to overcook it, as it’s softer and smoother than standard wheat. I’d recommend checking early and erring on the side of caution.

This recipe for pesto will make way more than you need for the pasta, but it keeps well in the fridge in a sealed jar or tupperware, and can be used for loads of other things. Try it spread on toast and sprinkled with feta, add more oil to loosen it and use it to dress a salad, dollop it onto roast vegetables for a flavour kick…

You don’t need to be too precious with the pesto quantities: just adjust to your personal taste if you’d prefer less garlic, or more cheese, or whatever takes your fancy. Spelt spaghetti and red pesto is a forgiving dish!

Ingredients

spelt spaghetti (80 – 100g per person, depending on how hungry you are)
1 jar of sun-dried tomatoes in oil
½ jar sun-dried peppers in oil
1 generous bunch parsley, roughly chopped
3 cloves garlic, crushed
around 1/2 a block of Parmesan, grated
100g toasted walnut pieces
extra virgin olive oil
salt and pepper

  1. Bring a large pan of generously salted water to the boil, then cook your spaghetti according to pack instructions.
  2. While your pasta is cooking, drain your tomatoes and peppers in a sieve over a bowl, keeping the oil. Reserve a handful each of parsley and Parmesan, then pop your tomatoes, peppers, the rest of your parsley, garlic, the rest of your Parmesan, and walnuts in a food process, and blitz to a rough paste. Drizzle in some of the oil from your jars of tomatoes and peppers, and a generous glug of extra virgin olive oil, then blend again until you have your desired consistency. Taste, season, and adjust to your preference.
  3. When your pasta is cooked al dente, drain it, reserving a couple of tablespoons of the pasta water. Put your spelt spaghetti back in its pan with the cooking water, then stir through a couple of generous spoonfuls of the pesto, until everything is well-coated. Serve your pasta topped with your reserved parsley and Parmesan.
DSC_0149-5

The Bake Off Bake Along: White Chocolate and Apricot Spiced Teacakes

I was pretty excited for this edition of the bake off bake along, because I love bread. Completely love it. I bake bread quite a bit at home, and I always love bread week on GBBO. But was it just me, or was this a bit of a lacklustre bread week? In my head, a teacake is a biscuit chocolate marshmallow type deal. I have never even eaten a bread-style teacake, let alone made one. And the technical challenge seemed a little dull to me. I’ve never heard of or eaten a cottage loaf either, but isn’t it basically just standard white bread in an unusual shape? Bread sculptures are all well and good, but they’ve done that before. This isn’t even the first time someone’s made a bread octopus on the show. I didn’t think the episode as a whole was particularly exciting.

But still. Even an unexciting episode of Bake Off is enough to make me pretty happy. And the bake off bake along is a great excuse to try something new.

DSC_0129-1024x683

I’ve been making a real effort to actually, er, learn the bakers’ names this week (did not have that nailed last week), and I was very happy to see Julia get star baker. Probably because she’s from Siberia, so in my head she’s a kindred spirit (I used to live in Siberia, in case that connection wasn’t clear).

Also next week is caramel week!!! One exclamation mark was not enough to demonstrate my excitement. I cannot wait for that bake off bake along session.

Before that happy moment, however, we’ve got the bread week bake along to get through. I’ve gone for teacakes, mostly because I found them a more interesting prospect than a cottage loaf and obviously I am not making a bread sculpture. And you know what? They were bloody delicious.

DSC_0146-1-1024x683

Source:

It seemed sensible to start with Paul’s Hollywood’s recipe, for obvious reasons.

Notes:

The recipe instructed me to make eight teacakes, so I obediently did so. But they were absolutely massive! Like pillows! I mean, worse things have certainly happened, but if I was making them again I’d divide the dough into ten pieces.

Ingredients

500g strong white bread flour
10g salt
60g golden caster sugar
1 tsp ground allspice
10g instant yeast
50g butter, softened
300ml tepid water
Flavourless oil for kneading, such as vegetable or sunflower
150g dried apricots, finely chopped
100g white chocolate, cut into small chunks
1 beaten egg, to glaze

Method

  1. I made all this in a mixer with a dough hook, because I am lazy. Pop the flour, salt, sugar, allspice, and yeast into your large mixing bowl. Add your butter and roughly three quarters of your measured water, and either begin kneading by hand or turn on your mixer. Gradually add more water until you end up with a soft (but not too wet or batter-like) dough – I found mine was perfect with all 300ml, but you may need more or less, depending on lots of factors like the absorbency of your flour. If you’re kneading by hand, tip your dough onto a lightly oiled surface and go at it until your dough is beautifully silky and smooth, probably around ten minutes. If you’re using a mixer, just let it do the work. Either way, lightly oil your bowl, cover it (I use clingfilm), and leave your dough to rise until at least doubled in size – a long, gentle prove will give your a better flavour in your dough. I left mine for two hours.
  2. Get two baking trays ready, lining them with silicone or baking paper. Pop your proved dough onto a lightly floured counter, and pull it into a rough rectangle shape. Scatter your apricots and white chocolate over it, and then roll your dough up like a swiss roll – I find this helps to get an even distribution of fruit and chocolate from the off. Knead the dough for a few minutes until it feels like the extras are well distributed.
  3. Weigh your dough, then divide it into ten equal pieces. Shape each into a ball, then place it on your baking tray and press it down gently with the flat of your palm to flatten it a little. Brush each with beaten egg, then place the baking trays into plastic bags and leave the teacakes to prove until doubled in size again – at least another hour. Heat your oven to 200C/ 180C fan/ gas 6.
  4. Bake your teacakes for ten to fifteen minutes (mine took twelve), until risen, golden, and smelling amazing. Cool on a wire rack or do what I did and eat immediately with butter.

This bake off bake along is not particularly great for anyone trying to eat healthily. I think all my bakes have contained chocolate so far. Although admittedly that’s my own fault.

DSC_0044-2

Ricotta, Citrus, and Chocolate Tart

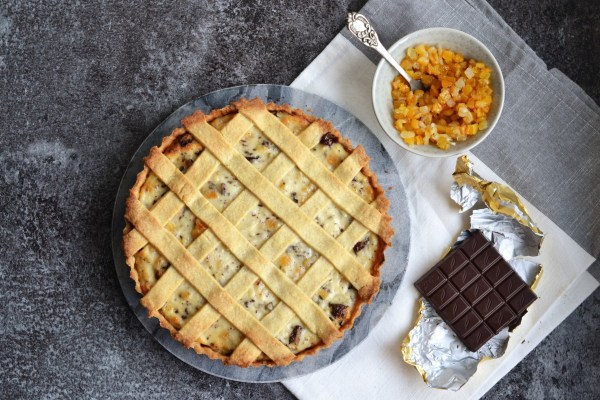
Have you ever eaten cannoli? If not, I advise you to stop reading this blog post and go and find yourself some immediately. There’s a little Italian deli on the Cowley Road in Oxford called Il Principe, and it sells properly lovely and authentic Italian food. I mean, I assume it’s authentic. The owners are Italian and I’m not, so what do I know? Anyway, they do an irresistible cannoli. A crisp, fried tube of delicate pastry, filled with ricotta and mixed peel, finished with dark chocolate and icing sugar. It is one of my favourite treats. And so I was always going to love this Ricotta, Citrus, and Chocolate Tart.

Yes, I know I did a chocolate tart pretty recently. But this is a totally different being.

DSC_0020-1024x683

You may well ask why I didn’t just make cannoli, if I love them so much. The problem is that, although you can buy ready-made cannoli shells, they’re pretty difficult to get hold of. They’re also not a patch on the freshly handmade variety. And to make them by hand you need to buy special cannoli tubes to shape the dough around while it’s fried. Even I, a great lover of kitchen equipment, don’t think I could really justify such a purchase. To make it a legitimate buy, I’d have to make cannoli every week. And while, in principle, that sounds like a fabulous idea, in practice I feel logistical issues and health worries might render it impractical as a lifestyle choice.

DSC_0026-1024x683

The proper name for this recipe is Torta Squisita, according to Amelia, my friend and former colleague. She’s spent half her life in Italy, speaks the language and knows the food. It was she who introduced me to the original recipe for this tart, before I messed with it. I’ve made changes, of course, and fiddled with the method, which is why it’s been rechristened as Ricotta, Citrus, and Chocolate Tart. It’s not as pretty a name. But it tells you what it is, and I don’t want to go pretending my version is the proper Italian deal, because it isn’t. It’s really, really delicious though.

Golden, lemon-scented pastry holds a filling of baked ricotta, studded with candied citrus peel and rich flakes of dark chocolate. It’s decadent, and a little bit unusual if you’re looking for something different. When I make this tart, I have to give it away fairly quickly, because I cannot be trusted around it. It’s genuinely one of my absolute favourite desserts. If left alone with it, I will demolish it single-handedly in an embarrassingly short amount of time.

DSC_0029-1024x683  </a/p>

Source

The original recipe for this tart comes from the lovely Amelia Earl, who I used to work with at the cookery school.

Notes

Making your own pastry for this is best, because this recipe will give you a rich, buttery, lemon-y base for the tart. However, if you’re in a rush or simply cannot be bothered to make your own pastry, then a couple of sheets of shop-bought shortcrust will do as a substitute in a pinch.

If you like, you can completely skip the lattice top to this, and simply bake the tart with an open top.

Ingredients

for the pastry

375g plain flour
pinch of salt
75g sugar
zest of 1 lemon
210g cold butter, cubed
3 egg yolks
4-5 tbsp chilled water

for the filling

500g ricotta
125g candied peel (should come diced into small cubes)
150g good quality 70% dark chocolate, cut into rough rubble
100g golden caster sugar
1 large egg

Method

  1. First, make your pastry. Put your flour, salt, sugar, and lemon zest in a food processor. Give it a quick blitz to combine. Add your cubed butter, and pulse until the mixture resembles breadcrumbs. Add your eggs yolks and 2 tbsp cold water, and pulse until the pastry starts to come together. If it doesn’t come together and still seems dry, add more water 1 tbsp at a time until it is a cohesive pastry. Tip it out onto clingfilm and knead it together briefly. Divide it into two chunks, one being 3/4 of the total pastry and the other 1/4. You can also leave it in one big piece if you don’t want to do a lattice top. Shape each chunk into a disc, wrap in clingfilm. Chill in the fridge for around 20 minutes, or until fairly firm.
  2. While your pastry chills, make your filling. Mix your ricotta, candied peel, dark chocolate, sugar, and egg together until just combined, and set aside. Heat your oven to 190C/170C fan.
  3. Roll out your larger piece of pastry and use it to line a tart tin (roughly 23cm in diameter). Trim the edges. If your pastry has become very soft, pop the tin in the fridge for ten minutes or so to let the pastry firm up before it goes in the oven. When you’re ready, line the pastry case with baking paper, then fill with baking beans or rice, and bake blind for around 10 minutes. Remove the paper and beans and bake for around another five minutes. You want the pastry to have lost its rawness and started to colour lightly.
  4. While the case is baking, if you’re planning to do a lattice top, roll out your smaller piece of pastry into a rough rectangle and cut it into long strips.
  5. When your pastry case is blind baked, pour your filling into the tart case, and smooth the top. If you’re doing a lattice, lay your strips of pastry in your prepared pattern over the filling. You’re supposed to weave them in and out for a proper lattice, but I always just lay them on top of each other! Pop the whole thing back in the oven and bake for around 30 minutes, or until the lattice pastry is baked and golden and the tart filling is set. Let the tart cool for five or 10 minutes, but do remove it from the tin while it’s still warm, or it could stick.
DSC_0014-2

The Bake Off Bake Along: Chocolate Peanut Butter Sandwich Biscuits

How are we all doing? Are we all settled in to the new season of Bake Off yet? What do we think? Everyone up for some chocolate peanut butter sandwich biscuits for today’s bake off bake along?

I am definitely enjoying the show, and I will keep watching, but I have to say I don’t think it’s quite where it used to be. I caught a bit of a old season four episode when I was channel-flicking the other day, and the show was really in its prime then. Although I do like Sandi and Noel, and think they’re doing a great job, they obviously haven’t got the same chemistry as Mel and Sue, who worked together for so many years before Bake Off. I am also finding the ad breaks more and more annoying. There are so many of them! I rarely watch stuff on live TV, so I’m not really used to the constant interruptions, and it’s a pain. Also, for some reason, I haven’t quite gotten attached to any of this year’s bakers yet. I’m having trouble remembering all their names, which I haven’t done in previous seasons, and I haven’t particularly picked out any front-runners.

Anyway, enough of all that. You don’t need to hear my rambling opinions about the show. Let’s get on to the baking.

DSC_0001-1-1024x683

One of my friends, who also does the bake off bake along, messaged me a couple of days ago, telling me she had had hours of trials and tribulations trying to do the technical this week, only to come out with some funny looking fortune cookies and burnt fingers. I am totally not even attempting fortune cookies. She is far braver than I. The technical challenges are really hard this year, and we’re only in the second week! Also, obviously I am not making a biscuit board game. Remember last week, when I said I was going to be taking the path of least resistance with these bakes? That definitely rules out biscuit board games.

So, sandwich biscuits it was.

DSC_0048-683x1024

Chocolate peanut butter sandwich biscuits just sound like a win, don’t they? Unfortunately, not so much. I mean, don’t get me wrong. They tasted fine. But they were such a surprising hassle to make. Sandwich biscuits, usually, shouldn’t be. For these, though, everything kind of went wrong early on. I pulled it back, but I did almost chuck the biscuit dough in the bin at one point. I know a bad workman blames their tools, but for this, I am definitely blaming the recipe.

DSC_0049-1024x683

So where is this recipe?

There isn’t one. I mean, there was one. But the base recipe I was working from was so flawed that I’m not going to share it here, because I don’t want anyone going through the same amount of hassle that I did. The biscuit dough was entirely the wrong texture and literally impossible to shape into a log and slice as directed. I ended up rolling it out and stamping out rounds, and even that was tricky. The biscuits are therefore overworked and completely the wrong texture. Still perfectly edible with a peanut butter filling (which I also ended up improvising because the quantities in the given recipe were way off), a drizzle of chocolate, and a pinch of salt. But not as they should be.

Normally, I’d keep tinkering with the recipe and try out new versions until I got it right. Unfortunately for these chocolate peanut sandwich biscuits, I did not have the time to do that this week. Working and commuting full time has made my baking sessions pretty much non-existent. Making batches and batches of biscuits in a quest for perfection simply wasn’t happening.

So, a pretty poor attempt at the bake off bake along from me this week! Sorry gang. Hopefully I’ll be back on form next time. And if anyone has a good recipe for chocolate peanut butter sandwich biscuits, give me a shout.

DSC_0018-1

Courgette and Feta Fritters

These courgette and feta fritters do a pretty good job of exemplifying my attitude towards health food. That is, you can take something perfectly healthy and fresh and lovely, like a courgette, and that’s fine. But then you can mix it with eggs and cheese and fry it. Yes, you’ve kind of marred its health credentials. But hey, you’ve got a super tasty snack.

DSC_0003-1024x683

This is the second in my series of recipe collaborations. Last time, I was working with Wild Honey. This time, it’s 2 North Parade. They’re a fantastic independent produce shop here in Oxford, who work with local suppliers and really focus on high quality, fresh, seasonal food. When I visited the shop to pick up some bits and pieces to work on this recipe collaboration, I was absolutely spoilt for choice.

For these courgette and feta fritters, I’ve used 2 North Parade’s beautiful courgettes, along with the feta they sell from Blackwood’s Cheese Company (seriously the best feta I have ever tasted), and the yoghurt they stock from North Aston Dairy. When I was there, though, I also picked up some beautiful sweetcorn, along with a delicious jar of local honey. The staff are really friendly and very happy to chat with you about all the produce they stock. Well worth a visit, particularly if you are looking for something special.

DSC_0063-3-1024x730

Notes:

You can fritter all sorts of vegetables! Sweetcorn? Definitely. Cauliflower? Why not! Broccoli? The choice is yours. Make your own adventure. If anything, courgettes are the slightly (ever so slightly) trickier option, because you have to wring the excess liquid out of them.

This recipe should make around 10 fritters, depending on how large you make them.

Ingredients:

500-600g courgette (you don’t need to be too exact, but it’s about 2 large courgettes or 3 medium ones)
2 cloves garlic, peeled and crushed
½ red onion, finely chopped
2 eggs
150g feta cheese, crumbled
zest and juice of 1 lemon
salt and pepper
100g wholemeal flour (plain works fine too, but I like the taste of the wholemeal here)
½ tsp baking powder
a generous pinch of chilli flakes
olive oil, for frying
150g plain natural or Greek yoghurt
a handful of fresh dill, finely chopped

Method:

  1. Put your oven on a low heat – around 100C/ gas 1. First, top and tail your courgettes, and then grate them roughly. Toss the grated courgette with a good pinch of sea salt, then pop it all in a sieve above a bowl to drain for ten minutes.
  2. Meanwhile, crush your garlic, finely chop your onion, and pop them both in a large bowl. Add your eggs, feta cheese, lemon zest, and a good pinch of salt and grind of pepper. Once your courgettes have had around ten minutes of draining time, get a bit more water out of them by either pressing them firmly against the sieve or popping them in a clean tea-towel and wringing them out. Put your drained courgettes into the bowl with the other ingredients, then add your flour, baking powder, and chilli flakes. Give it all a quick mix until combined.
  3. Pop your biggest frying pan on a medium-high heat, and pour in a generous glug of olive oil, to just coat the base. Shape the courgette mix into fritters in your hands. When the oil is hot, put your fritters in (in batches, so as not to overcrowd the pan) and fry for 3-4 minutes a side until golden. When they’re cooked, remove from the pan and pop in the low oven to keep warm while you fry the rest.
  4. Finish by mixing your yoghurt with your lemon juice, dill, and seasoning to taste, and serve the courgette and feta fritters warm with the yoghurt.
DSC_0104

The Bake Off Bake Along: Pear, Chocolate, & Almond Cake

The Great British Bake Off is back. I, for one, couldn’t be happier. Yes, all things being equal, I would have preferred for the show to remain on the BBC, but at least in part for fussy logistical reasons. I don’t like advert breaks, and I don’t like All 4 as much as iPlayer. But I still think everything’s going to be okay. I love Mel and Sue, and I love Mary, but I can hardly go complaining about Prue Leith as a replacement (having somewhat of a Leiths connection…), and I think Sandi and Noel stepped admirably into large shoes. They kept the music. I’m happy. So, here we are again, for the Bake Off Bake Along. And here’s my pear, chocolate, and almond cake. Really, any excuse to make a chocolate cake.

DSC_0096-1024x683

I’ve got a rather busy couple of months coming up, as I’ll be commuting to London and working full time for a while. Unfortunately, this busy period coincides exactly with the time to Great British Bake Off is airing. so while I’m going to try to have a stab at the Bake Along, I’ll be taking the path of least resistance every time. This week, that means a fruity cake.

Mini rolls are lovely and all, but fiddly and hard to make look pretty. And the showstopper was never going to happen. One of the things I am most terrible at, baking-wise, is making cakes look like other stuff. If it’s tasty and looks like a cake, I’m all for it.

And this pear, chocolate, and almond cake is tasty. And it looks like a cake. A chocolate cake, at that.

DSC_0114-4-1024x683

If you want to know what this Bake Off Bake Along shindig is all about, check out this post by Amanda over at Rhyme and Ribbons here. It’s just an excuse to watch TV and bake cake, really.

DSC_0136-1024x683

Source:

Loosely adapted from this recipe.

Notes:

This lovely chocolate cake just so happens to be gluten free, but doesn’t use any fancy special flours or ingredients. It’s moist, soft, and keeps well. You could, of course, try it with other fruit. The fruit will sink into the cake quite a bit as it bakes, but don’t worry, you’re going for a rustic look.

Ingredients:

100g butter, plus a little extra to grease
100g 70% dark chocolate
2 tbsp rum (you can skip this if you want)
100g caster sugar, plus a little extra for the tin
3 eggs, separated
100g ground almonds
2 ripe pears, peeled, cored, and quartered
100g raspberries
icing sugar to dust and cream or ice cream to serve, if you like

Method:

  1. Heat your oven to 180C/ 160C fan/ gas 4. Put your butter and dark chocolate in a glass bowl above a pan of simmering water to melt together. Butter a 23cm loose-bottomed or springform cake tin, line the base, butter everything again, and then pop a couple of tbsp caster sugar into the tin and roll it round to coat the base and sides.
  2. Remove your melted butter and chocolate from the heat, stir in the rum if using, and leave to cool. Pop your caster sugar in a bowl with your egg yolks and whisk with an electric whisk until thick and mousse-like. Fold this into the chocolate mixture, then add the ground almonds and fold those in too.
  3. In a separate bowl with clean beaters, whisk your egg whites to stiff peaks. Beat a big spoonful of the egg whites into the chocolate mixture to loosen, then fold the rest in carefully. Gently pour your mixture into your cake tin, then arrange your pear slices and raspberries on top of the batter. Bake for around half an hour, or until risen and firm. Leave to cool in the tin for at least 15 minutes before trying to remove it, as it’s quite delicate. Serve with icing sugar, cream, or ice cream, if you like.