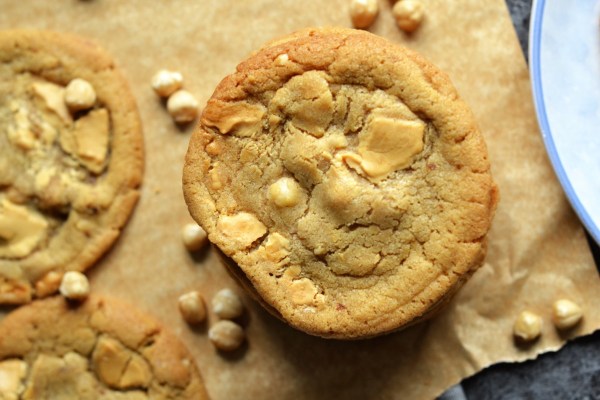
I was going to do a completely different recipe this week, but we’ve ended up with caramelised white chocolate and hazelnut cookies, slightly by accident. In last week’s Taste Test post, I mentioned caramelised white chocolate in passing. I got a surprising number of reactions, ranging from ‘I have never found a white chocolate I like so I am intrigued by your caramelised white chocolate and don’t believe it will change my opinion’, to ‘Please post a recipe for caramelised white chocolate. Please.’
Lots of people are very opposed to white chocolate, and I can see why. There’s the old argument that it’s not really chocolate, as it contains no cocoa solids, being made instead of cocoa butter, sugar, and milk solids. Poor quality white chocolate is often blandly sweet. I would argue, though, that good quality white chocolate certainly has its place, and when caramelised it becomes a true delight.
When caramelised, white chocolate progresses beyond bland sweetness, and develops a deeper, warmer flavour. It reminds me of caramel (well, duh) and peanut butter. If you start with a good quality white chocolate (I’d recommend at least 30% cocoa butter) with a hint of vanilla, then add a good pinch of sea salt before caramelising, you get a grown-up treat.
You can then do any number of things with your caramelised white chocolate. If you leave it in liquid form, it makes an excellent ganache, an enhancing icing ingredient, or the beginnings of an amazing ice cream. You can also do what I did here: let it set solid, then break it up into pieces. That way, you can put it into cookies, use it to decorate cakes, or (let’s be honest) just straight up eat it. I won’t tell.
This is a twist on a basic chocolate chip cookie recipe I posted on the site ages ago. The main point of this post is to tell you all that caramelised white chocolate is amazing, but this is also a really great base cookie recipe that definitely deserves your attention. If I can’t convince you to jump on the caramelised white chocolate bandwagon, you can always use other chocolate and make the cookies anyway.
Source:
The base cookie recipe here is minorly adapted from The Violet Bakery, by Claire Ptak.
Notes:
This recipe will yield around 20 generously sized cookies. They will keep well in an air-tight container for three or four days. If you have more willpower than we do.
Caramelised white chocolate is very easy to make, but it does take a little time. This time is basically all passive though – you just need to let it do its thing and check in now and then.
Ingredients:
for the caramelised white chocolate
200g good quality white chocolate (I actually caramelised 400g so that 200g could go into the cookies and 200g could be reserved for other purposes)
good pinch of sea salt
for the cookies
250g butter, softened
200g light brown sugar
100g caster sugar
1 tsp vanilla extract or, if you have it on hand, vanilla bean paste
3 large egg yolks
325g plain flour
1 tsp fine sea salt
1 tsp bicarbonate of soda
100g blanched, toasted hazelnuts, roughly chopped
Method – Caramelised White Chocolate
- First, caramelise your chocolate. Heat your oven to 140C/120C fan/gas 1. Break your chocolate into pieces if it’s in a block, put it on a (clean, dry) baking sheet with a rim, sprinkle it with a pinch of sea salt, then pop it in the oven for 10 minutes to melt. Take it out, smooth it and spread it around with a (clean, dry) spatula, then pop it back in the oven.
- Keep going for around 40-60 minutes, taking it out and stirring it around every 10 minutes or so to ensure it’s caramelising evenly. It might look like it’s going lumpy or chalky, but give it a stir and it’ll sort itself out. Everyone’s oven is different so I can’t say precisely how long you want to keep going for, but you’re aiming for a peanut butter kind of colour. Keep tasting it! Stop when you are happy. You can see in my video below how the chocolate thickens and darkens – I’ve taken this one pretty slowly on a low oven, but you can push it a little faster if you’re confident.
- If you get to the end of the process and your chocolate has lumps you’re not happy with (more likely if you are using a chocolate with a low cocoa butter percentage) just pop it in a blender and give it a quick whizz with a teaspoon or two of flavourless oil. Never add water! If you want the chocolate solid, spread it out on baking parchment or silicone on a cool tray and leave it to set, or pop it in the fridge if you’re impatient.
Method – Cookies
- For the cookies, line a baking tray which will fit in your freezer with parchment paper. In your largest bowl or in a stand-mixer, beat the butter and both types of sugar together until just combined and even, then beat in the vanilla and egg yolks – all at once is fine. Add your flour, salt, and bicarbonate, then mix to form a stir, firm dough. Finally, fold in your hazelnuts, then break your white chocolate into rough pieces and fold them in too. I like to reserve a few pieces and press one into the top of each cookie.
- Using a small ice cream scoop, scoop the dough into cookies and pop them on your lined tray. You’ll have fairly large scoops of dough – mine were around 45g. Freeze for an hour, or up to a month.
- Heat your oven to 180C/ 160C fan/ gas 4, and take the cookies out of the freezer. Spread the frozen dough between three or four lined baking trays – you need to give them a lot of space to expand. Let them rest at room temperature for five to ten minutes while the oven heats up, and then pop them in. Bake for 15-20 minutes (it was 16 in my oven), until the outsides of the cookies are baked and crispy, but the insides still feel soft and underbaked. Let them rest on the counter to firm up for at least 10 minutes.


