DSC_0018-1

Hot Cross Cookies

Let’s get the obvious thing out of the way first. I suck at piping white chocolate. Try to ignore how messy these look, and appreciate that hot cross cookies are an excellent addition to the Easter baking roster. I am a big fan of Easter brownies, and generally go for the ‘add creme eggs and mini eggs and it’s a done deal’ school of Easter baking.

DSC_0001-1024x683

But sometimes, you’ve got to mix it up. I love hot cross buns passionately, but there’s no denying they’re a bit of a faff to make. They’re not stupidly difficult or anything, but as with most breads you have to wait for things to rise and prove and so on. And sometimes (okay, often) I am just too impatient for such things. Enter: hot cross cookies.

DSC_0027-1024x683

Notes

This recipe makes around 20 generously sized cookies.

If, like me, you live in a two person household, and don’t want to bake 20 cookies at once because you know you will just eat them all, I have a solution for you. Freeze all the cookie dough (i.e. get up to the end of step 2 in the recipe), then bake the cookies off in batches of two or four or whatever is manageable for the next few weeks. You will have delicious freshly-baked cookies in fifteen minutes in small batches.

Ingredients

250g butter, softened
200g light brown sugar
100g caster sugar
3 large egg yolks
325g plain flour
1 tsp fine sea salt
1 tsp bicarbonate of soda
2 tsp cinnamon
1 tsp allspice
100g mixed peel (should come diced but chop it finely if not)
100g raisins or sultanas
75g white chocolate

Method

  1. Line a baking tray which will fit in your freezer with parchment paper. In your largest bowl or in a stand-mixer, beat the butter and both types of sugar together until just combined and even, then beat in the egg yolks – all at once is fine. Add your flour, salt, bicarbonate, cinnamon, and allspice. Mix to form firm dough. Finally, fold in your mixed peel and sultanas.
  2. Using a small ice cream scoop (or spoons, or your hands…) scoop the dough into golf ball sized rounds and pop them on your lined tray. Freeze for an hour, or up to a month.
  3. Heat your oven to 180C/ 160C fan/ gas 4, and take the cookies out of the freezer. Spread the frozen dough between three or four lined baking trays – you need to give them a lot of space to expand.  Bake for 15-20 minutes, until the outsides of the cookies are baked and crispy, but the insides still feel soft and underbaked. Let them rest on the counter to firm up for at least 10 minutes. Remove to wire racks to cool completely before piping on your chocolate.
  4. Melt your white chocolate however you see fit (in a bowl over a pan of simmering water is safest, but I often just microwave on medium power in short bursts for such small amounts). Pop it in a piping bag (or a sandwich bag), snip off the end, and pipe crosses onto your cool cookies. Alternatively, skip the cross thing and just drizzle them recklessly with chocolate. Less Easter-themed, but slightly easier.
DSC_0026

Oreo Cookie Brownies

First off, I have to tell you that these brownies are not my invention. They are my version of a very American thing called Slutty Brownies. I just… hate that name. I know that it’s different if you’re talking about baked goods rather than humans, but even so, ‘slutty’ is a horrible, derogatory word used almost exclusively to insult women, so, I’m out. Anyway, their original name doesn’t tell you what they are. Yeah, Oreo Cookie Brownies might not be as catchy a title, but it doesn’t use any offensive words and it tells you what you’re eating.

DSC_0029-1024x683

There are lots of American recipes for these floating round on the web, and they are pretty much all based on the premise of boxed cake mixes. Have any of you ever tried a box mix? I haven’t – not really from cake snobbery, I’m actually kind of curious – but because it has never occurred to me to buy one. Anyway, I think they’re much more of a Thing in the US than they are here in the UK. Hence, most other recipes for these delightful brownies involve making a boxed cookie mix, topping it with Oreos, and then making a boxed brownie mix and pouring it on top.

I admit, my way takes a little bit more work. But not much more! Cookie dough and brownie batter are both really quick to put together. And it’s much cheaper to make them from scratch with ingredients you probably already have lying around than it would be to buy two boxed mixes.

DSC_0017-1024x683

Having said all that, writing this has made me curious about boxed mixes, and now I am wondering if I should try one. You know, just to see if I am missing anything. Maybe that would be a fun idea for a Taste Test post? Buy all the boxed brownie mixes I can find, then make them all, then… well, nothing good would come of that really, would it?

DSC_0014-1024x683

Notes

You could, of course, ignore everything I have just said and do this with two boxed mixes if you like.

Also, I haven’t tried it yet, but I feel like Reese’s Peanut Butter Cups would also be excellent in here in place of the Oreos, should you be that way inclined.

Do try to start with room temperature butter if you can. It really speeds everything up. Also, you should pretty much always be baking with room temperature eggs.

Ingredients

cookie layer
165g butter, softened
130g light brown soft sugar
65g caster sugar
1/2 tsp vanilla extract
2 large egg yolks
215g plain flour
1 tsp fine sea salt

Double sleeve of Oreos – my tin takes 16

brownie layer
200g dark chocolate, 70% cocoa solids
140g butter
225g caster sugar
2 eggs, plus 1 extra yolk
1 tsp vanilla extract
100g plain flour

Method

  1. Preheat your oven to 180C/160C fan/ gas 4. Grease and line a 20cm square tin. You’ll make your cookie layer first, but start by putting your 200g dark chocolate and 140g butter for the brownies in a bowl over a pan of simmering water to melt gently in the background.
  2. Now, get on with your cookie layer. Beat your butter, light brown soft sugar, and caster sugar together until evenly combined and light – I do this in a stand mixer but electric beaters or a wooden spoon will do the job. Beat in your vanilla and egg yolks until evenly combined. Finally, mix in your flour and salt. Press your cookie dough mix in an even layer into the base of your tin.
  3. Place Oreos on top of the cookie dough. My tin takes 16 but just place as many as comfortably fit in a grid in a single layer on top of the dough.
  4. On to the brownies. Your chocolate and butter should be nicely melted together by now, so take them off the heat. With an electric beater or by hand, beat in your sugar. When combined, beat in your eggs and extra yolk with the vanilla – keep beating for a couple of minutes until it’s smooth, glossy, and sightly lightened and thickened. Finally, fold in your flour. Pour your brownie batter on top of your cookie dough and Oreos and smooth the top.
  5. Bake for 25 minutes, or until the brownie layer is firm around the edges (it will probably start to crack a little at the sides, which is fine). It’s okay for it to seem soft in the middle, but you don’t want completely raw batter. Eat hot and gooey from the pan, or chill to set for a couple of hours and then cut into neat squares.
DSC_0168

Oatmeal Rum Raisin Cookies

I initially made these cookies by accident. I was making a huge batch of various baked goods for an event. The kitchen was completely full of finished and half-made delicious things, with trays of macarons and cooling cakes on every surface (my tiny kitchen doesn’t really have many surfaces). I was making a pan of brownies that had a cookie dough base and Oreos in the middle, and I messed up the quantities and ended up with a load of spare cookie dough. Maths is not my strong point.

DSC_0164-1024x683

So I had this plain cookie dough without a purpose, and no time to think properly about what to do with it. I had raisins. I had oats. I had rum. The cookies were born.

The first time I made these, I threw the ingredients in randomly, without measuring, and didn’t pay much attention because I was making loads of other things too. And they were amazing. So very good. I had to give them away to stop myself from eating them all immediately.

DSC_0193-1024x683

So I was then faced with the task of recreating the cookies of joy. I mean, you know, there have been worse tasks. I played around for a bit, and this is what I came up with. Unfortunately I can never make them again, unless I’m prepared to eat an entire batch of oatmeal rum raisin cookies myself very quickly.

DSC_0201-1024x683

Notes

This recipe makes around 20 generously sized cookies.

Ingredients

150g raisins
75ml rum
250g butter, softened
200g light brown sugar
100g caster sugar
1 tsp vanilla extract
3 large egg yolks
325g plain flour
1 tsp fine sea salt
1 tsp bicarbonate of soda
1 tsp cinnamon
1 tsp allspice
a little grated whole nutmeg
120g oats

Method

  1. Pop your raisins and rum together in a bowl to soak. Line a baking tray which will fit in your freezer with parchment paper. In your largest bowl or in a stand-mixer, beat the butter and both types of sugar together until just combined and even, then beat in the vanilla and egg yolks – all at once is fine. Add your flour, salt, bicarbonate, cinnamon, allspice, and nutmeg. Mix to form firm dough. Finally, fold in your oats, raisins, and any un-absorbed rum.
  2. Using a small ice cream scoop, scoop the dough into golf ball sized rounds and pop them on your lined tray. Freeze for an hour, or up to a month.
  3. Heat your oven to 180C/ 160C fan/ gas 4, and take the cookies out of the freezer. Spread the frozen dough between three or four lined baking trays – you need to give them a lot of space to expand.  Bake for 15-20 minutes, until the outsides of the cookies are baked and crispy, but the insides still feel soft and underbaked. Let them rest on the counter to firm up for at least 10 minutes. Eat with reckless abandon.
DSC_0014-2

The Bake Off Bake Along: Chocolate Peanut Butter Sandwich Biscuits

How are we all doing? Are we all settled in to the new season of Bake Off yet? What do we think? Everyone up for some chocolate peanut butter sandwich biscuits for today’s bake off bake along?

I am definitely enjoying the show, and I will keep watching, but I have to say I don’t think it’s quite where it used to be. I caught a bit of a old season four episode when I was channel-flicking the other day, and the show was really in its prime then. Although I do like Sandi and Noel, and think they’re doing a great job, they obviously haven’t got the same chemistry as Mel and Sue, who worked together for so many years before Bake Off. I am also finding the ad breaks more and more annoying. There are so many of them! I rarely watch stuff on live TV, so I’m not really used to the constant interruptions, and it’s a pain. Also, for some reason, I haven’t quite gotten attached to any of this year’s bakers yet. I’m having trouble remembering all their names, which I haven’t done in previous seasons, and I haven’t particularly picked out any front-runners.

Anyway, enough of all that. You don’t need to hear my rambling opinions about the show. Let’s get on to the baking.

DSC_0001-1-1024x683

One of my friends, who also does the bake off bake along, messaged me a couple of days ago, telling me she had had hours of trials and tribulations trying to do the technical this week, only to come out with some funny looking fortune cookies and burnt fingers. I am totally not even attempting fortune cookies. She is far braver than I. The technical challenges are really hard this year, and we’re only in the second week! Also, obviously I am not making a biscuit board game. Remember last week, when I said I was going to be taking the path of least resistance with these bakes? That definitely rules out biscuit board games.

So, sandwich biscuits it was.

DSC_0048-683x1024

Chocolate peanut butter sandwich biscuits just sound like a win, don’t they? Unfortunately, not so much. I mean, don’t get me wrong. They tasted fine. But they were such a surprising hassle to make. Sandwich biscuits, usually, shouldn’t be. For these, though, everything kind of went wrong early on. I pulled it back, but I did almost chuck the biscuit dough in the bin at one point. I know a bad workman blames their tools, but for this, I am definitely blaming the recipe.

DSC_0049-1024x683

So where is this recipe?

There isn’t one. I mean, there was one. But the base recipe I was working from was so flawed that I’m not going to share it here, because I don’t want anyone going through the same amount of hassle that I did. The biscuit dough was entirely the wrong texture and literally impossible to shape into a log and slice as directed. I ended up rolling it out and stamping out rounds, and even that was tricky. The biscuits are therefore overworked and completely the wrong texture. Still perfectly edible with a peanut butter filling (which I also ended up improvising because the quantities in the given recipe were way off), a drizzle of chocolate, and a pinch of salt. But not as they should be.

Normally, I’d keep tinkering with the recipe and try out new versions until I got it right. Unfortunately for these chocolate peanut sandwich biscuits, I did not have the time to do that this week. Working and commuting full time has made my baking sessions pretty much non-existent. Making batches and batches of biscuits in a quest for perfection simply wasn’t happening.

So, a pretty poor attempt at the bake off bake along from me this week! Sorry gang. Hopefully I’ll be back on form next time. And if anyone has a good recipe for chocolate peanut butter sandwich biscuits, give me a shout.

DSC_0021-4

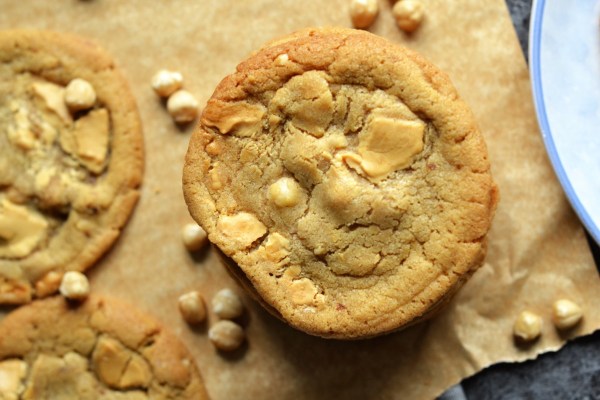
Caramelised White Chocolate & Hazelnut Cookies

I was going to do a completely different recipe this week, but we’ve ended up with caramelised white chocolate and hazelnut cookies, slightly by accident. In last week’s Taste Test post, I mentioned caramelised white chocolate in passing. I got a surprising number of reactions, ranging from ‘I have never found a white chocolate I like so I am intrigued by your caramelised white chocolate and don’t believe it will change my opinion’, to ‘Please post a recipe for caramelised white chocolate. Please.’

Lots of people are very opposed to white chocolate, and I can see why. There’s the old argument that it’s not really chocolate, as it contains no cocoa solids, being made instead of cocoa butter, sugar, and milk solids. Poor quality white chocolate is often blandly sweet. I would argue, though, that good quality white chocolate certainly has its place, and when caramelised it becomes a true delight.

DSC_0001-1-683x1024

When caramelised, white chocolate progresses beyond bland sweetness, and develops a deeper, warmer flavour. It reminds me of caramel (well, duh) and peanut butter. If you start with a good quality white chocolate (I’d recommend at least 30% cocoa butter) with a hint of vanilla, then add a good pinch of sea salt before caramelising, you get a grown-up treat.

You can then do any number of things with your caramelised white chocolate. If you leave it in liquid form, it makes an excellent ganache, an enhancing icing ingredient, or the beginnings of an amazing ice cream. You can also do what I did here: let it set solid, then break it up into pieces. That way, you can put it into cookies, use it to decorate cakes, or (let’s be honest) just straight up eat it. I won’t tell.

DSC_0040-1-1024x683

This is a twist on a basic chocolate chip cookie recipe I posted on the site ages ago. The main point of this post is to tell you all that caramelised white chocolate is amazing, but this is also a really great base cookie recipe that definitely deserves your attention. If I can’t convince you to jump on the caramelised white chocolate bandwagon, you can always use other chocolate and make the cookies anyway.

Source:

The base cookie recipe here is minorly adapted from The Violet Bakery, by Claire Ptak.

Notes: 

This recipe will yield around 20 generously sized cookies. They will keep well in an air-tight container for three or four days. If you have more willpower than we do.

Caramelised white chocolate is very easy to make, but it does take a little time. This time is basically all passive though – you just need to let it do its thing and check in now and then.

Ingredients: 

for the caramelised white chocolate

200g good quality white chocolate (I actually caramelised 400g so that 200g could go into the cookies and 200g could be reserved for other purposes)
good pinch of sea salt

for the cookies

250g butter, softened
200g light brown sugar
100g caster sugar
1 tsp vanilla extract or, if you have it on hand, vanilla bean paste
3 large egg yolks
325g plain flour
1 tsp fine sea salt
1 tsp bicarbonate of soda
100g blanched, toasted hazelnuts, roughly chopped

Method – Caramelised White Chocolate

  1. First, caramelise your chocolate. Heat your oven to 140C/120C fan/gas 1. Break your chocolate into pieces if it’s in a block, put it on a (clean, dry) baking sheet with a rim, sprinkle it with a pinch of sea salt, then pop it in the oven for 10 minutes to melt. Take it out, smooth it and spread it around with a (clean, dry) spatula, then pop it back in the oven.
  2. Keep going for around 40-60 minutes, taking it out and stirring it around every 10 minutes or so to ensure it’s caramelising evenly. It might look like it’s going lumpy or chalky, but give it a stir and it’ll sort itself out. Everyone’s oven is different so I can’t say precisely how long you want to keep going for, but you’re aiming for a peanut butter kind of colour. Keep tasting it! Stop when you are happy. You can see in my video below how the chocolate thickens and darkens – I’ve taken this one pretty slowly on a low oven, but you can push it a little faster if you’re confident.
  3. If you get to the end of the process and your chocolate has lumps you’re not happy with (more likely if you are using a chocolate with a low cocoa butter percentage) just pop it in a blender and give it a quick whizz with a teaspoon or two of flavourless oil. Never add water! If you want the chocolate solid, spread it out on baking parchment or silicone on a cool tray and leave it to set, or pop it in the fridge if you’re impatient.

Method – Cookies

  1. For the cookies, line a baking tray which will fit in your freezer with parchment paper. In your largest bowl or in a stand-mixer, beat the butter and both types of sugar together until just combined and even, then beat in the vanilla and egg yolks – all at once is fine. Add your flour, salt, and bicarbonate, then mix to form a stir, firm dough. Finally, fold in your hazelnuts, then break your white chocolate into rough pieces and fold them in too. I like to reserve a few pieces and press one into the top of each cookie.
  2. Using a small ice cream scoop, scoop the dough into cookies and pop them on your lined tray. You’ll have fairly large scoops of dough – mine were around 45g. Freeze for an hour, or up to a month.
  3. Heat your oven to 180C/ 160C fan/ gas 4, and take the cookies out of the freezer. Spread the frozen dough between three or four lined baking trays – you need to give them a lot of space to expand. Let them rest at room temperature for five to ten minutes while the oven heats up, and then pop them in. Bake for 15-20 minutes (it was 16 in my oven), until the outsides of the cookies are baked and crispy, but the insides still feel soft and underbaked. Let them rest on the counter to firm up for at least 10 minutes.
DSC_0045-1

Spanish Almond Cookies

These Spanish almond cookies are my attempt at going abroad this year. In a culinary, if not actual, way.

James and I aren’t very good at going on holiday. We do overnight sojourns to odd corners of England every so often for various events, but we haven’t actually been properly ‘on holiday’ out of the country since a long weekend in Paris in April 2014. Which was incredible and wonderful and lovely and Paris is pretty much my favourite place and if every holiday for the next ten years was going back to Paris ad infinitum then I would be cool with it. But it was only for three days, and it was over three years ago.

DSC_0034-1024x683

Time and money, money and time. It’s so boring. They’re the same problems everyone else has too. But for some reason we haven’t managed to get round them, probably because I am an itinerant cookery teacher/freelance chef/food blogger. When you don’t have a proper salary and have full on anxiety about paying for things like the electricity and food, it’s kind of hard to justify spending money on flights and accommodation. And, er, more food in a different country.

We had a lovely little mini-honeymoon after we got married last year – a three day weekend in London. But we never went on the kind of honeymoon where you have to get vaccinations before you travel and end up take selfies at the top of mountains at sunset. And we’re never going to have that sort of honeymoon because no way am I climbing up a mountain voluntarily. But we have finally, tentatively, pencilled a week in Spain in October into the calendar. Flights to Spain are really cheap. We can worry about accommodation at a later date. Related: do I know anyone who lives in Spain?

DSC_0032-1-683x1024

Also, most importantly, the food in Spain is amazing. Or so I hear. I am trying to get into the spirit four months early with these little almondy morsels of delight. They are a liberally adapted version of what is apparently a Spanish almond cookie, so we’re not aiming for absolute authenticity here, but they are properly tasty: a crisp shell around a chewy, delicate interior, lightly lemon-scented and incredibly moreish. They’re also dairy and gluten free, and I was halfway to convincing myself they were healthy before I remembered the sugar.

I love a classic, American style cookie as much (and more) than the next person, but these Spanish almond cookies have won me over in their own delicious, subtle way.

DSC_0040-1024x683

Source:

Based on and adapted from this recipe for Spanish almond cookies.

Notes: 

This recipe is stunningly easy. Only a few ingredients, five minutes to make the dough, five minutes to shape it into cookies, fifteen minutes in the oven, and you’re away. No dairy, no gluten, they keep well. Clearly the Spanish are onto something.

I doubled the recipe for these photos because I wanted to give the cookies to a friend, but the quantity below makes around 12-15 cookies, depending on how big you make them.

I made the dough in a food processor because I’m lazy, but you could just as easily do it in a large bowl.

Ingredients:

150g ground almonds
80g caster sugar
zest of 1 lemon
1/4 teaspoon sea salt
1 large egg
handful of whole, skin-on almonds to top the cookies

Method:

  1. Heat your oven to 190C/170C fan/gas 5. Line a baking sheet. Pop your ground almonds, sugar, lemon zest, and salt in a food processor, and blitz for a few seconds to combine. Add your egg, and blitz again, stopping to scrape down the sides. You should end up with an even, sticky dough.
  2. Dampen your hands slightly with cold water so that the dough doesn’t just stick to your fingers, and roll it into balls, each around 1 tbsp worth of mixture. Arrange them on your baking sheet, press a whole almond into each one, and bake for around 15 minutes until golden. If your oven bakes unevenly you might want to turn the tray halfway through cooking.

Update:

August 2017 – I made about 200 of these as part of a wedding dessert table I was handling a couple of weeks back, and I can report that they freeze really excellently well.

DSC_0030

Egg Yolk Chocolate Chip Cookies

I have an extensive Amazon wishlist. Once upon a time it was full of all manner of things, but now it’s essentially just cookbooks. The problem with this is that cookbooks tend to cost quite a bit more than your standard paperback novel, and so buying three or four in a blinded, lustful daze can easily set you back a bit of money. So I have to ration myself, and only buy one now and then. Or when there’s something I really want, obviously.

In bookshops it’s even worse. I have to actively avoid the cooking section in most of them, because I never walk away without something new. They’re so tempting, cookbooks: beautiful and tactile, heavy and reassuring, full of delicious things. I am a big book lover in general and have curated a huge collection of fiction since childhood, but cookbooks are a different thing entirely. A novel is full of mysterious, hidden promise, and you don’t know if it will deliver until you have invested some time in it. A quick flick through a cookbook will reveal its bright offerings, and you can know in two minutes whether or not it’s a tome you want to cook from.

DSC_0008-1024x683

I’d had my eye on Claire Ptak’s The Violet Bakery for a while, so when our lovely wedding florist mentioned that she’d bought it and it was excellent, that was all the encouragement I needed.

The book definitely passed the ‘flick through test’. When I first get a cookbook, I tend to sit down and mark up all the recipes I want to make from it immediately. In The Violet Bakery, there were literally dozens. Inviting, interesting, delicious-looking things. Raspberry and star anise crumble muffins. Apricot kernel upside down cake. Wild blackberry tart.

And the first thing I made from the book was a batch of chocolate chip cookies.

I mean, I like chocolate chip cookies, but they are a humble delight and I certainly wouldn’t say they were my favourite thing to bake, or anywhere near the most enticing thing in this book. But the recipe called for three egg yolks, and I just happened to have three egg yolks sitting around in the fridge, waiting to be used up (all the whites had gone on macaron-related escapades). And since I had everything else I needed for this recipe in the cupboard, I thought it was worth a go.

DSC_0041-1024x683

Source: As above, the glorious cookbook from The Violet Bakery, by Claire Ptak. I really would advise you to go and buy it if you are at all interested in happiness and joy.

Notes: I only made a couple of minor tweaks to this recipe. This is very, very unlike me, but I have actually dialled the salt down slightly, because I felt that it was too much, and increased the vanilla because I thought it needed to be a clearer note. Also unlike me, but I recommend using a good quality milk chocolate, rather than dark as suggested. As you can see, I made them with a mixture of milk and dark chocolate, and I found the dark chocolate too overwhelming here.

I found these cookies were actually a bit better on the second day – they softened a bit and became more chewy than crispy, which is my preference.

Ingredients: 

250g butter, softened
200g light brown sugar
100g caster sugar
1 tsp vanilla extract or, if you have it on hand, vanilla bean paste
3 large egg yolks
325g plain flour
1 tsp fine sea salt
1 tsp bicarbonate of soda
250g milk chocolate chips, or a chocolate bar broken into chunks

Method:

  1. Line a baking tray which will fit in your freezer with parchment paper – I had to bake these cookies in batches because I can only fit one baking tray in my freezer at a time. In your largest bowl, beat the butter and both types of sugar together with an electric mixer until just combined and even, then beat in the vanilla and egg yolks – all at once is fine.
  2. In another bowl, sieve your flour, salt, and bicarbonate together. Add this to the butter mixture along with the chocolate and mix until combined – it will be a stiff, firm dough.
  3. Using a small ice cream scoop, scoop the dough into cookies and pop them on your cold tray. Freeze for an hour, or up to a month. I could only do half at a time because my freezer is absolutely full of stuff, and I couldn’t fit all the dough on one baking sheet, so I put the rest of the dough in the fridge while I was waiting for the first cookies to chill in the freezer.
  4. Heat your oven to 180C/ 160C fan/ gas 4, and take the cookies out of the freezer. Make sure they are well spaced on the tray as they will expand massively when baked. Let them rest at room temperature for five to ten minutes while the oven heats up, and then pop them in. Bake for 15-20 minutes (it was 16 in my oven), until the outsides of the cookies are baked and crispy, but the insides still feel soft and underbaked. Let them rest on the counter to firm up for at least 10 minutes.