DSC_0026

Oreo Cookie Brownies

First off, I have to tell you that these brownies are not my invention. They are my version of a very American thing called Slutty Brownies. I just… hate that name. I know that it’s different if you’re talking about baked goods rather than humans, but even so, ‘slutty’ is a horrible, derogatory word used almost exclusively to insult women, so, I’m out. Anyway, their original name doesn’t tell you what they are. Yeah, Oreo Cookie Brownies might not be as catchy a title, but it doesn’t use any offensive words and it tells you what you’re eating.

DSC_0029-1024x683

There are lots of American recipes for these floating round on the web, and they are pretty much all based on the premise of boxed cake mixes. Have any of you ever tried a box mix? I haven’t – not really from cake snobbery, I’m actually kind of curious – but because it has never occurred to me to buy one. Anyway, I think they’re much more of a Thing in the US than they are here in the UK. Hence, most other recipes for these delightful brownies involve making a boxed cookie mix, topping it with Oreos, and then making a boxed brownie mix and pouring it on top.

I admit, my way takes a little bit more work. But not much more! Cookie dough and brownie batter are both really quick to put together. And it’s much cheaper to make them from scratch with ingredients you probably already have lying around than it would be to buy two boxed mixes.

DSC_0017-1024x683

Having said all that, writing this has made me curious about boxed mixes, and now I am wondering if I should try one. You know, just to see if I am missing anything. Maybe that would be a fun idea for a Taste Test post? Buy all the boxed brownie mixes I can find, then make them all, then… well, nothing good would come of that really, would it?

DSC_0014-1024x683

Notes

You could, of course, ignore everything I have just said and do this with two boxed mixes if you like.

Also, I haven’t tried it yet, but I feel like Reese’s Peanut Butter Cups would also be excellent in here in place of the Oreos, should you be that way inclined.

Do try to start with room temperature butter if you can. It really speeds everything up. Also, you should pretty much always be baking with room temperature eggs.

Ingredients

cookie layer
165g butter, softened
130g light brown soft sugar
65g caster sugar
1/2 tsp vanilla extract
2 large egg yolks
215g plain flour
1 tsp fine sea salt

Double sleeve of Oreos – my tin takes 16

brownie layer
200g dark chocolate, 70% cocoa solids
140g butter
225g caster sugar
2 eggs, plus 1 extra yolk
1 tsp vanilla extract
100g plain flour

Method

  1. Preheat your oven to 180C/160C fan/ gas 4. Grease and line a 20cm square tin. You’ll make your cookie layer first, but start by putting your 200g dark chocolate and 140g butter for the brownies in a bowl over a pan of simmering water to melt gently in the background.
  2. Now, get on with your cookie layer. Beat your butter, light brown soft sugar, and caster sugar together until evenly combined and light – I do this in a stand mixer but electric beaters or a wooden spoon will do the job. Beat in your vanilla and egg yolks until evenly combined. Finally, mix in your flour and salt. Press your cookie dough mix in an even layer into the base of your tin.
  3. Place Oreos on top of the cookie dough. My tin takes 16 but just place as many as comfortably fit in a grid in a single layer on top of the dough.
  4. On to the brownies. Your chocolate and butter should be nicely melted together by now, so take them off the heat. With an electric beater or by hand, beat in your sugar. When combined, beat in your eggs and extra yolk with the vanilla – keep beating for a couple of minutes until it’s smooth, glossy, and sightly lightened and thickened. Finally, fold in your flour. Pour your brownie batter on top of your cookie dough and Oreos and smooth the top.
  5. Bake for 25 minutes, or until the brownie layer is firm around the edges (it will probably start to crack a little at the sides, which is fine). It’s okay for it to seem soft in the middle, but you don’t want completely raw batter. Eat hot and gooey from the pan, or chill to set for a couple of hours and then cut into neat squares.
DSC_0145

Mulled Wine Brownies

I know what you’re thinking. This blog just doesn’t have enough brownie recipes. I agree. It’s a serious problem. Don’t worry, I’m here to help. Mulled wine brownies it is.

DSC_0093-683x1024

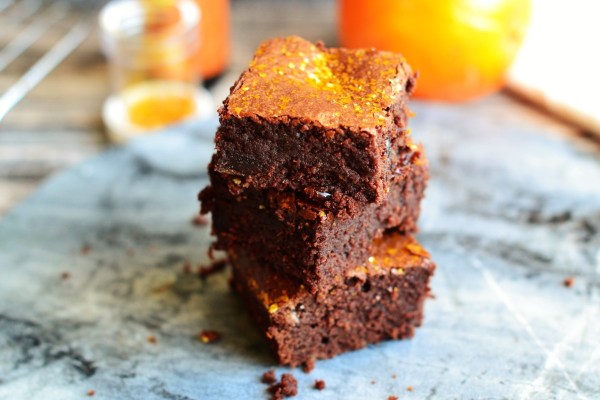
I was never really a huge fan of mulled wine until they gave us some of the really good stuff at culinary school and it was one of the most delicious things I have ever had to drink. Now I have developed a taste for it and have a highly positive opinion of mulled wine flavoured things. Hence, these brownies.

DSC_0131-1024x683

Because I have a whole cupboard full of cake ingredients, I have edible glitter to hand at all times, but obviously it tastes of nothing and I only added it to these brownies to make them sparkly. Because it’s Christmas (almost). And it feels right and proper to put glitter on everything.

DSC_0139-1-1024x683

Ingredients:

140g butter
200g good quality 70% dark chocolate
225g golden caster
2 eggs, plus 1 egg yolk
1 tsp almond extract
120ml red wine
zest of 1 orange
110g plain flour
generous grating of whole nutmeg
1/4 tsp ground cloves
1/2 tsp ginger
1/2 tsp cinnamon
75g dried cherries

Method:

  1. Break your chocolate into pieces and chop your butter into rough cubes. Place them both in a glass or metal bowl over a pan of gently simmering water and leave them to melt, stirring occasionally. Preheat your oven to 180C/160C fan/gas 4. Grease and line a 20x20cm square tin.
  2. While your chocolate and butter melt, weigh your sugar, and mix your eggs with your extra yolk and your almond extract. When your chocolate and butter have completely melted, beat in your sugar (I use an electric hand whisk), followed by your eggs. Add your red wine and orange zest. Add your flour and spices to the mixture and beat that in too. Stir through your dried cherries.
  3. Pour the mixture into the tin and smooth the surface. Bake for around 20-25 minutes. The brownies will have risen and started to crack a little round the edges, but still be soft in the middle. They will firm as they cool.
DSC_0110-1

Peanut, Banana, and Caramel Brownies

I would be exaggerating if I said my favourite thing about our trip to Seville was the peanut, banana, and toffee brownie I ate at Regadera. But it was definitely among my top five favourite things of the holiday. That and the kitten we met. And, uh, the architecture. Obviously.

I knew I wouldn’t be able to recreate it exactly at home. Part of the joy of that particular dessert was delivered in the form of an incredible banana ice cream, and I don’t have an ice cream maker. But I couldn’t get the idea of a peanut, banana, and caramel brownie out of my head. Yes, it seemed like a lot of ingredients to throw at a brownie. But I know that chocolate and banana are good together. And that banana and peanut butter are good together. And that banana and caramel are good together. I mean, it at least didn’t seem like a terrible idea.

DSC_0119-1024x683

I’ve made chocolate banana bread many times before, so I was hoping that the bananas in brownies idea would work in a similar way – that the bananas would make the brownies even more moist, dense, and fudgy. And, happily, this is exactly what they did.

These brownies are undoubtedly a bit much for some people. There are plenty of purists who like their brownies plain, perhaps with one addition if they’re going wild. But, as you might be able to tell if you’ve read this blog at all, I’m not really one of those people.

DSC_0147-1024x683

Notes:

If this is all a bit much for you, you could skip out one of the peanut/banana/caramel triumvirate. But I promise it’s tasty.

Brownies keep really excellently well in the freezer. You can make a batch, cut them, freeze them, then whip one out and microwave it for thirty seconds every time the brownie urge strikes.

Ingredients:

200g 70% dark chocolate
140g butter
200g caster sugar
2 eggs
100g plain flour
2 very ripe bananas, mashed
100g roasted peanuts
3 tbsp peanut butter
5 tbsp salted caramel (buy in a jar or make your own)

Method:

  1. Break your chocolate into pieces and chop your butter into rough cubes and place them both in a glass or metal bowl over a pan of gently simmering water. Leave them to melt, stirring occasionally. Preheat your oven to 180C/160C fan/gas 4. Grease and line a 20x20cm square tin.
  2. When your chocolate and butter have completely melted, beat in your sugar (I use an electric hand whisk), followed by your eggs. Add your flour to the mixture and beat that in too. Mix in your bananas, then stir through your peanuts and peanut butter.
  3. Pour the mixture into the tin, smooth the surface, and then dollop your salted caramel on top of the batter and swirl it around with a knife or skewer. Bake for around 25 mins – the salted caramel will sit in a liquidy way on top of the batter and make you think the brownies are not done, but they will firm as they cool.
  4. Normally I advocate eating brownies warm from the pan, and while you absolutely can do that here, they will be very gooey. If I need to slice these neatly or take them anywhere I normally let them chill and firm in the fridge for a couple of hours first.
DSC_0101

Popcorn Brownies

Ah, popcorn brownies. An odd thing for someone who is not a big popcorn fan to make. I was inspired by the Paul A. Young class that my mother and I attended. What we ate that day is somewhat of a glorious chocolate-y blur, but it included a popcorn chocolate so delicious that my mother ended up ordering some to be sent directly to her door. And when I say ‘some’, I think she got about eight bars.

DSC_0074-1024x683

So, while I am not a real lover of popcorn in its purest form (it’s fine, it’s just a bit… meh), I liked the idea of it in chocolate. The concept of a salty crunch in a brownie appealed to me. Unsurprisingly, because, well, brownies. Brownies and I, we have previous, you know?

As always, I couldn’t resist gilding the lily. I felt like the brownies needed one more element. I couldn’t work out what it might be for a while, until I was searching for marmalade in the cupboard (ooh, marmalade brownies! Now there’s an idea…) and came across a jar of biscuit spread. I just about managed to stop myself from eating the entire jar of biscuit spread with a spoon, and instead used it in a brownie recipe. For you guys. Because I’m kind like that.

DSC_0098-1-1024x683

I took these brownies to a friend’s house after I’d finished photographing them, and everyone there assured me that they are a winner. So I can recommend this (perhaps slightly odd) combination of ingredients with confidence. They’re chocolatey. They have a salty popcorn crunch. And they’ve got caramelised biscuit spread on top. You can’t lose, really.

DSC_0126-683x1024

Notes:

If you have never tried Lotus Biscuit Spread then… well, maybe save yourself and avoid it, because that stuff is addictive. It’s really, really good here, and you can get it at large supermarkets. If you don’t want to use it, or can’t find it, then you can substitute home-made or shop-bought salted caramel. You could also stud the top of the brownies with chocolate chunks, or leave them as popcorn-only brownies. But really, the biscuit spread is delicious.

I used salty popcorn here because I didn’t want the brownies to be overly sweet, but of course you can use whatever weird and wonderful popcorn you like.

Ingredients:

200g good quality 70% dark chocolate
140g butter
2 large eggs, plus 1 extra yolk
225g golden caster sugar
100g plain flour
1 tsp salt
15g salted popped popcorn, crushed into small pieces (I put it in a sandwich bag and bashed it)
150g Lotus Biscuit Spread

Method:

  1. Break your chocolate into pieces, chop your butter into rough cubes and place them both in a glass or metal bowl over a pan of gently simmering water and leave them to melt, stirring occasionally. Preheat your oven to 180C/160C fan/gas 4. Grease and line a 20x20cm square tin.
  2. While your chocolate and butter melt, mix your eggs with your extra yolk, and weigh out your sugar. When your chocolate and butter have completely melted, beat in your sugar (I use an electric hand whisk), followed by your eggs. Add your flour and salt to the mixture and beat that in too. Stir through your crushed popcorn
  3. Pour the mixture into the tin, smooth the surface, and then dollop your biscuit spread, if using, on top of the batter and swirl it around with a knife or skewer. Bake for around 25 mins – remember brownies will firm up as they cool.
  4. If you need to slice these neatly or take them anywhere then let them chill and firm in the fridge for a couple of hours first. They are also delicious eaten warm and gooey from the oven.


popcorn_brownies_pinterest-342x1024

DSC_0013

Salted Caramel Brownies

Granted, this is not an original idea in any way at all. Salted caramel brownies have become so popular that you’d be hard-pressed to find a bakery that doesn’t sell them. Salted caramel, unlike scores of other food trends (I’ve still not really got a handle on that whole cronut/cruffin/duffin situation, to be honest), has proven itself to have some serious staying power – probably because it’s stupidly tasty. Put it with chocolate, and you’re pretty much guaranteed a moment of happiness.

So I’m not really bringing anything new to the party with this recipe. And yet, brownies are the thing I bake the most regularly, and salted caramel is now the most requested flavour. I did a quick reckoning, and realised that I only have three brownie recipes on this blog which, considering I have been doing this for nearly two years, is actually pretty restrained. If you are thinking that this is not at all restrained, then probably you have not met me.

DSC_0001-1-1024x683

Anyway, it’s my little corner of the internet, and thus I have decided I am completely within my rights to swerve ‘pioneering’ and ‘original’, and land with a flump on ‘probably passé as food trends go but delicious enough to justify its own existence’. So here is my version of salted caramel brownies.

Notes: I have rattled on about why I think brownies are magical enough on this website and I don’t think I should really revisit the thesis. They’re still magical, though.

Obviously, feel free to skip or substitute where the white chocolate is concerned, but I really love it here. There’s something glorious about the light, sweet white chocolate against the bold density of the dark chocolate brownie and the salty complexity of the caramel.

The salted caramel recipe here will make about double the amount you will need for the brownies. I like to have spare on hand if I am going to the trouble of making it because I will always use it in something, but if you don’t want any extra then halve the quantities.

DSC_0021-1-1024x683

Ingredients:

200g good quality 70% dark chocolate
140g butter
2 large eggs, plus 1 extra yolk
1 tsp vanilla extract
225g golden caster sugar
100g good quality white chocolate
100g plain flour
1 tsp salt

for the salted caramel

200g granulated sugar
90g salted butter, cut into cubes
120ml double cream
2 tsp sea salt

Method:

  1. First, make the salted caramel, so that it has time to cool and thicken a little before use. Heat the sugar in a pan with a fairly large surface area (I use a frying pan) over a medium heat. Resist the temptation to stir it – you can shake the pan a bit. Keep an eye on it. Nothing will happen for ages, then the base of the sugar will start to melt. Gently swirl the pan around, moving the sugar about, until it’s all melted into a lovely golden coppery liquid.
  2. Now whisk the butter into the sugar, a few cubes at a time, until it’s all incorporated and completely melted. Don’t worry if the mixture looks split at this stage. Now drizzle in your cream while continuing to stir the caramel – be careful, as the mixture will bubble and hiss. Boil the mixture for one minute, then remove from the heat and stir in the salt. Taste (carefully) and adjust as needed, then let cool.
  3. Now, for the brownies. Break your chocolate into pieces and chop your butter into rough cubes and place them both in a glass or metal bowl over a pan of gently simmering water and leave them to melt, stirring occasionally. Preheat your oven to 180C/160C fan/gas 4. Grease and line a 20x20cm square tin.
  4. While your chocolate and butter melt, mix your eggs with your extra yolk and your vanilla, and weigh out your sugar. Chop or break your white chocolate into chunks. When your chocolate and butter have completely melted, beat in your sugar (I use an electric hand whisk), followed by your eggs. Add your flour and salt to the mixture and beat that in too. Stir through your white chocolate chunks.
  5. Pour the mixture into the tin, smooth the surface, and then dollop your cooled salted caramel on top of the batter and swirl it around with a knife or skewer. Bake for around 25 mins – the salted caramel will sit in a liquidy way on top of the batter and make you think the brownies are not done, but they will firm as they cool.
  6. Normally I advocate eating brownies warm from the pan, and while you absolutely can do that here, they will be very gooey. If I need to slice these neatly or take them anywhere I normally let them chill and firm in the fridge for a couple of hours first. Finish with a sprinkling of sea salt, if you like.
DSC_0027

Easter Brownies Two Ways

Childhood Easter egg hunts are the very stuff of dreams, no? They’re one of those experiences that are utterly magical when you’re small, and it’s the sort of magic that, sadly, cannot be replicated as an adult. Never again will dashing around the garden, crazy high on sugar and looking for your next hit, basket clutched in sticky hands, hold the same delight. Now I am unlikely to run for anything unless being chased by something genuinely dangerous, and I have the means to simply go out and buy chocolate of my own accord. These developments are welcome, but they sadly come at the expense of the exhilarating Easter egg hunts I once knew.

DSC_0026-2-1024x683

Just a quick post today with a very simple idea: Easter brownies for kids and adults. I love brownies and I go on about them on here all the time, but so far I have only posted one recipe, so now it’s time for me to start slowly expanding my archives. Here, I’ve taken one basic brownie recipe, inspired by the standard in my Leiths textbook, and have suggested two completely different variations. For kids, a lighter chocolate, pieces of toffee, and an assortment of bright eggs. For adults, rich and dark 85% chocolate, homemade marzipan, cherries, a hefty dollop of kirsch, and some white chocolate drizzle. I mean, in theory, one was for kids and one was for adults, but there’s nothing to stop adults eating the kid version, as James proved when he took them into the office. Er, maybe kids shouldn’t eat the adult version though, because they’ve got quite a bit of booze in them.

DSC_0012-1024x699

So it’s just a quick post today, because I have eaten a horrifying and wonderful amount of chocolate and I need to go and have a lie down. Whatever you are up to on this Sunday which is both sunny and stormy (somehow), I hope you’re having a lovely time and enjoying some shameless decadence.

DSC_0039-1024x683

Source: My base recipe is adapted from the one in the Leiths book, which I use on a daily basis.

Notes: This recipe will work best in a 20cm x 20cm square tin. They keep very well and freeze excellently (simply zap a frozen brownie in the micowave for 30 seconds in a chocolate deprivation emergency and enjoy a gooey treat). I always undercook my brownies so that they are fudgy and delicious and, when hot from the oven, almost spoonable, but feel free to leave yours in the oven for an extra 5 minutes if you are looking for something a little bit more robust.

The method is the same for both versions, with slightly different additions.

Ingredients:

200g chocolate (60% for the kid version, 85% for the adult version)
140g butter
225g golden caster sugar
2 large eggs, plus 1 extra yolk
1 tsp vanilla extract
1 tsp salt
90g plain flour for kid version, 120g plain flour for adult version

For kid version

2x 90g packets of little eggs (I have used Cadbury and Galaxy here, but anything will work), half left whole and half chopped roughly
3 Creme Eggs cut in half (I find a knife dipped in hot water best for this)
50g toffee pieces

For adult version

100g marzipan, cut into roughly 2cm chunks (I made my own but shop bought is fine – let me know if you want a home made marzipan recipe and I am happy to post one)
4 tbsp kirsch
100g pitted cherries, chopped roughly (I used tinned here)
50g white chocolate

DSC_0010-1024x683

Method:

  1. Break your chocolate into pieces and chop your butter into rough cubes and place them both in a glass or metal bowl over a pan of gently simmering water and leave them to melt, stirring occasionally. Preheat your oven to 180C/160C fan/ gas 4. Grease your square tin. I line the base too, because, you know, belt and braces, but if you have a good non-stick tin or one with a removable base then you can get away with not doing that.
  2. While your chocolate and butter melt, mix your eggs with your extra yolk and your vanilla, and weigh out your sugar. Chop and prep whichever additional ingredients you are using. When your chocolate and butter have completely melted, beat in your sugar (I use an electric hand whisk), followed by your eggs. Sift the flour and salt over the mixture and then beat that in too. For the kid version, stir through some chopped and whole eggs and half your toffee pieces. For the adult version, stir through your cherries, marzipan, and kirsch. Pour the mixture into the tin, smooth the surface, and bake for 25-30 mins or until done to your satisfaction. You want a crisp and crackly top, but remember they will firm up a bit as they cool.
  3. For the kid version, grab your brownies out of the oven 5 minutes before they are due to be done and press the Creme Egg halves and remaining mini eggs into the surface of the mixture, then continue to bake for 5 mins until they are slightly melted into the surface. For the adult version, melt the white chocolate while the brownies are cooking and let them cool for five minutes before drizzling it over the finished product.
DSC_1087

Leiths: Foundation Term, Week 5

In one of our many introductory talks, I distinctly remember someone saying that by the end of Week 5, everything would have started to fall into place. We’d be used to the routine of Leiths, we’d have built up some stamina, we’d have the basic skills to be able to navigate most of the recipes… we’d be amazing, basically. That last bit’s not what they said, but you know.

I don’t feel amazing, exactly, but I’ve settled into the routine. It now seems like a completely normal thing for me to get up at ridiculous o’clock and trek to London to cook daily. So much so that the clocks going back has thrown me off a bit. I’m used to leaving the flat in the dark: the new cold light of morning is not kind to my 6.30am face. Nevertheless, I now know exactly where to stand on the train platform so that the door of my favourite carriage judders to a halt directly in front of me: it’s the small satisfactions that get me through the commute.

Looking at our timetable this week, it initially seemed like Leiths was going easy on us Monday-Wednesday in order to make up for the fact that Thursday was our first all-day cooking marathon. More on that in a moment. Monday was fairly lovely as cooking sessions go – brownies, scones, tartare sauce, and feeding our Christmas cakes. We were delighted to find that we had been provided with a substantial vat of clotted cream and gigantic jars of jam for scone-garnishing purposes (cream then jam, obviously, you heathens) and spent a happy afternoon melting chocolate, shaping scone dough, and sampling the booze we’d brought to feed our Christmas cakes, in the name of science.

DSC_1057-1024x576

Things were slightly less relaxing on Tuesday, when we made pastry and chilli. Because we’ve made pastry four times now, we were expected to know what we were doing… and it turns out that I don’t. I messed up the shaping of my pastry in the flan ring, and even after I’d spent a good fifteen minutes perfecting the edges, it still ultimately came out of the oven ugly and misshapen. The chilli, while a relatively simple recipe, did involve sixteen people browning mince over high heat at the same time. Such was the heat of the oil that things occasionally went up in flames, and not on purpose. We later finished our chilli – mine came out incredibly spicy – and developed our little pastry cases into lemon meringue pies. My meringue was a bit of a mess, but my lemon filling was tasty and held well, so I’m calling that a draw.

DSC_1075-1024x590
My slightly dodgy pie, on the left, and my partner’s much neater meringue, on the right.

Thursday, our first all-day cooking extravaganza, saw us making slow-cooked beef stew with caramelised baby onions and a potato and celeriac mash, individual loaves of white bread, goujons of plaice with tartare sauce, and fish stock. When I list it like that, it doesn’t actually sound like much. The thing is that at Leiths you can’t cut corners. If I was at home, for example, I’d whack my meat for browning in the pan all at once, and sort of vaguely get some colour on it whilst half watching 90s music videos on YouTube in the background and call it a day. At Leiths, we season and brown the meat in batches – being sure not to crowd the pan – lovingly turn each perfectly-sized piece in rotation to ensure all the meat is coloured evenly on all sides, and deglaze the pan after each batch and taste the juices. Obviously, doing everything properly takes much longer. Who knew? You can’t even have Mint Royale on in the background, and if you absent-mindedly start singing or whistling to yourself you get reprimanded, so you know they mean business.

DSC_1081-1024x576

Anyway, everything all went swimmingly. No, really. The day was absolutely fine, stress levels were pretty low, and the only real problem I had was that at the end of it I was so tired from being on my feet for eight hours that I had to sit on the floor while I waited for my bread to be marked because they could no longer carry me. And then I cycled 4.5 miles back to the station in the dark. And in the evening I went to bed at 9pm because I couldn’t keep my eyes open. But other than that.

DSC_1080-1024x646

Our Tuesday morning dem was with Belinda, who is a lovely, calming presence. She demonstrated many wonderful things that can be done with choux pastry (we demonstrated the eating of choux pastry – I always like to do my bit to be helpful), and we saw profiteroles, three types of éclairs, canapés, and savoury choux gougère. Wednesday was just as great, because it was steak day. Need I say more? Probably yes. Phil was technically demonstrating ‘tender cuts of meat and pan sauces’, but we all knew what that really meant: steak day. We got to sample bites of fillet, sirloin, rump, ribeye, and onglet, with various accompanying sauces and butters, and I felt quite spoiled. I don’t usually buy or order fillet steak because the price sort of scares me, so I’ve barely ever eaten it before, and it was gorgeous.

DSC_1070-1024x613
I know this is a rubbish picture, but I couldn’t get a proper view from where I was sitting and I wanted to demonstrate the abundance of steak.

The dem of the week, though, against very strong competition, was Friday’s buffet session with Hannah and Hélène. They prepared us a gorgeous array of delicious buffet food, and stood back to let us feast. I don’t know what would happen to me if I had to prepare eight or ten dishes to feed fifty people in a morning, but I imagine it would probably end with me crying in a corner and begging for mercy. We all had second helpings of everything, and then dessert, and then I don’t really know what happened for the next hour or so because I was in a happy food daze.

DSC_1085-1024x641

Also, chocolate roulade? Surprisingly amazing. I have had very dry and crumbly roulades in the past, but this was moist and chocolatey and completely lovely, and I will definitely be making it at some point.

The trouble is that now we have to work in groups to produce buffets for 32 people, and making a buffet doesn’t sound quite as relaxing as eating one was. In our teams, we have to come up with a theme, design a menu, work out costings to a strict budget, source all the ingredients, and, er, cook the whole thing in three hours and serve it beautifully to a jury of our peers and teachers before receiving feedback and being marked. I am sure I will panic more about this in a future blog.

DSC_1088-1024x618

So Week 5 is over, and we are officially halfway through Foundation. Everyone keeps telling me I look tired and pale, last night I was so exhausted that I got confused and walked into a wall, and next week I will continue to work with lots of knives and fire while practically sleepwalking. Still, on Monday we get to make chocolate mousse, blackberry pavlova, and steak, so that will definitely ease the pain a little if I end up losing a finger.

DSC_0005

Raspberry & Goats’ Cheese Brownies

I should have started writing a blog years ago. Literally, years ago. And the reason I didn’t is pretty stupid: I felt intimidated.

I’m a big reader of blogs, you see – I like nosing into other people’s lives and kitchens – so I am fully aware of the vast, huge, mountainous variety of things to read out there. It seems like every second person has a blog nowaways, and you can find one on almost any conceivable subject. There are thousands upon thousands of UK food blogs. I felt that if I started one of my own, I would just be shouting into the void. I always told myself that my cooking would never be as good as the others, my photographs never as polished, my writing never as engaging. I don’t think of myself as a creative person at all. And nobody would ever read it, so what would be the point?

I would look at all the of wonderful, talented, established food bloggers that I admire, and know that I could never get to that stage. It seemed to me that I should have started back in 2006, when food blogs were becoming ‘a thing’ for the first time. ‘I’m such an idiot!’ I would tell myself, ‘I could have done hundreds of posts by now! I could have archives! I could feel like I know what I am doing!’

I really never feel like I know what I am doing.

DSC_00171-1024x720

Eventually, I managed to convince myself that everyone has to start somewhere, and that it’s likely that all those people I admire probably used to feel like they were shouting into the void too. James always tells me that the idea is not to focus on what everyone else is doing, but to focus on doing your own thing as well as you can and recognising that you might have something the person next to you doesn’t. Of course, he’s much wiser than I am, and got his act together re: creative output many years ago.

That all sort of clumsily brings me on to these brownies.

DSC_0028-1024x683

Source: The recipe is from Faith Durand, and can be found on The Kitchn website, here. Faith Durand is one of those intimidatingly amazing people who I really admire (this is her career! She makes a living out of this! Have you seen that website?!), and I love her recipes. Of course, she’s American, so naturally I’ve had to convert the recipe because ounces and cups mean nothing to me. I’ve tweaked it very mildly in the process, but this is still hers.

Notes: These brownies actually taste better if you let them sit and eat them the next day. If you can manage that, though, you’re a better person than I. They also do very well frozen, and can be eaten cold.

Goats’ cheese and chocolate might sound weird, but I promise you, it’s perfection. If you are serving them to people who might raise eyebrows, just call them ‘raspberry cheesecake brownies’ and tell them what’s in them afterwards. Or don’t.

Ingredients:

125g raspberries, lightly crushed with a fork
2 tbsp kirsch, or crème de cassis, or whatver vaguely alcoholic red liqueur you have lying about
285g dark chocolate (70% or higher)
170g unsalted butter
125ml whole milk
400g caster sugar
1 tsp vanilla extract
4 large eggs
130g plain flour
¼ tsp baking powder
½ tsp salt

for the topping

225g goat’s cheese
110g full-fat cream cheese
30g unsalted butter
1 egg
50g sugar
1 tsp almond extract
Freeze dried raspberries, to decorate (optional)

Method:

  1. First, place your chocolate and butter in a bowl over a pan of simmering water to melt. I always put this on first because it usually unexpectedly takes ages.
  2. Heat the oven to 180C/ 160c fan/gas mark 4. Grease and line a brownie pan – I use a rectangular 30cm x 20cm one for everything. Lining the pan will make it far easier to get the brownies out later. Mix your liqueur with your raspberries and set it aside in a bowl to marinate.
  3. Your chocolate and butter should now be well on the way to melting. When it has, remove it from the heat and stir in the milk, and then let it cool for about five minutes. Then mix your sugar and vanilla into the chocolate mixture, and add your eggs one by one. Sift in the flour, baking powder, and salt, and fold until smooth. Chuck around half of the raspberries into the brownie mixture, stir, and spread it evenly into your pan.
  4. Now make the topping. I do this in a bowl with an electric hand whisk. Beat the goats’ cheese, cream cheese, butter, egg, sugar, and almond extract together until combined. Fold in the reserved raspberries – you don’t want them fully incorporated because you want the swirly ripple effect. Use a regular spoon to dollop the cheesecake mixture onto the top of the brownie mixture, then use a skewer or a knife to swirl it around until it looks marbled.
  5. Bake it for twenty minutes, then check it. You’re looking for the brownies to be just barely set in the middle, but starting to very lightly brown and crack around the outsides. It might take up the half an hour, depending on your oven and the size of your pan. As soon as you take them out of thee oven, sprinkle the freeze dried raspberry pieces over the top, if using. Leave to cool and set.


DSC_0040

Basic Brownies

Let’s start with some life advice from someone supremely unqualified to give it, shall we?

I really would recommend leaving university, if you are that way inclined, with at least a vague idea of what you would like to do with your life once you have clambered off the carousel of read-write-sleep-repeat. Instead of doing this, I cooked a lot. When I worried that I had no idea what my future career would be, well-meaning friends, family members, and supposed authority figures, would tell me that it would all come together in the end. ‘You’ll figure it out by the time you graduate!’, they said, blithely optimistic.

It didn’t work out exactly like that.

DSC_00291-1024x570

I did all the things you’re supposed to do. I won an internship for the summer between my second and third years. I wrote a CV. I went to all of the careers fairs the university offered. I saw a careers advisor. But I just… didn’t want to do any of the jobs that were real options. All of the jobs that I actually wanted to do (doctor, chocolatier, pilot, vet, recipe tester) were so wildly inaccessible to me, me with my English degree and my complete lack of experience, that I may as well have just said ‘I want to be a princess astronaut and have my own spaceship castle’, and left it at that.

Lots of people told me to do something I loved; not to worry about money or career progression at that stage, but to focus on doing something I enjoyed and trust that the rest would come later. Well, that’s all very well, but I needed money for WiFi and heating and croissants, and couldn’t afford to do unpaid internships. I was already deep in debt from degree number one, and I couldn’t bear the thought of further specialised study to actually get me onto a career path that might appeal, costing thousands of pounds and leaving me not earning for another year or two. So I left university feeling pretty directionless.

What I did have, instead of a five year plan and earning potential, was a fail-safe brownie recipe. It might not keep me warm at night (unless I eat enough brownies to cultivate an insulating layer of blubber) but it has other uses. I spent a summer testing various recipes, trying to find one that matched my brownie-ideals, and finally hit upon what I’m about to share with you below. I’ve memorised it and adapted it, and I genuinely can’t remember where the base recipe came from originally, so if you recognise it then please do let me know.

People are often down on brownies, thinking them dull and easy, but I think they are the solution to all of your dessert problems. They are incredibly quick and simple to make. They can be served hot and gooey, undercooked and fresh from the oven, with a scoop of ice cream. They can be served straight from the freezer in the summer, adorned with berries or sorbet. They are loved by children and adults alike. They keep, chilled, for ages. They are robust, and don’t mind a couple of hours in a hot car or a bumpy ride on the back of a bike.

Most of all, brownies are adaptable. Once you have a solid base recipe you are happy with, the possibilities are, if not literally endless, certainly numerous. Want to make them gluten free? Swap the flour for ground almonds. Want to make them vegan? Swap the eggs for apple sauce and the butter for oil. Want to feed people with allergies? Skip the nuts. Best of all, brownies are a vehicle. You can basically chuck anything you think would be good in there and call yourself a culinary genius.

DSC_0043-1024x683

Notes: This recipe makes dense, chocolatey, rich, fudgy (rather than cakey) brownies, as this is my preference. I always think you should be able to dent a brownie with your thumb.

Ingredients:

275g dark chocolate (I use Lindt 70%)
225g butter
190g plain flour
1 tsp baking powder
a pinch of salt
4 large eggs, beaten
1 tsp vanilla essence
200g caster sugar
100g granulated sugar (I find the granulated helps give the brownies a crackling top, but skip it and use all caster if that’s what you have)
200g of ‘extras’ – go wild. Chopped dark, white, or milk chocolate? Chunks of Mars, Crunchie, Bounty? Pecans, walnuts, peanuts? Peanut butter? Raspberries, strawberries, cherries, orange? Caramel, fudge, toffee? Bacon?

Method:

  1. Preheat your oven to 180C/160C fan/gas mark 4. Grease and line a rectangular baking pan (mine is 20cm x 30cm, but whatever you have will probably be fine).
  2. Melt the chocolate and butter together in a glass bowl set over a pan of simmering water. While the chocolate and butter are melting, sift the flour, baking power, and salt together in a mixing bowl. Chop and prepare any additions you want for your brownies.
  3. Dump the sugar(s), vanilla essence, and beaten eggs into the joyous bowl of chocolate loveliness once it’s all melted, stirring well after each addition. The longer and harder you beat the mixture after you add the eggs, the more crispy top you will get. Then add the chocolate mix to the dry mix and stir it all together. Chuck in any additions you may be using and stir again. Pour it into your lined pan.
  4. Bake. This takes 20 minutes in my rather fierce fan oven, but could be more or less in yours, so use your judgement. You want them just starting to crack on top, round the edges, but not quite set in the middle.
  5. Leave the brownies to set in the tin, if you want to serve them solid. You can cover them and pop them in the fridge or freezer when they’re cool enough. You can also cut and serve them immediately, hot and gooey, as a dessert. Or, er, just eat them straight from the pan. Not that I have ever done that.

Enjoy, and reflect proudly on the fact that you know exactly what you’re doing with your life.