DSC_0149-5

The Bake Off Bake Along: White Chocolate and Apricot Spiced Teacakes

I was pretty excited for this edition of the bake off bake along, because I love bread. Completely love it. I bake bread quite a bit at home, and I always love bread week on GBBO. But was it just me, or was this a bit of a lacklustre bread week? In my head, a teacake is a biscuit chocolate marshmallow type deal. I have never even eaten a bread-style teacake, let alone made one. And the technical challenge seemed a little dull to me. I’ve never heard of or eaten a cottage loaf either, but isn’t it basically just standard white bread in an unusual shape? Bread sculptures are all well and good, but they’ve done that before. This isn’t even the first time someone’s made a bread octopus on the show. I didn’t think the episode as a whole was particularly exciting.

But still. Even an unexciting episode of Bake Off is enough to make me pretty happy. And the bake off bake along is a great excuse to try something new.

DSC_0129-1024x683

I’ve been making a real effort to actually, er, learn the bakers’ names this week (did not have that nailed last week), and I was very happy to see Julia get star baker. Probably because she’s from Siberia, so in my head she’s a kindred spirit (I used to live in Siberia, in case that connection wasn’t clear).

Also next week is caramel week!!! One exclamation mark was not enough to demonstrate my excitement. I cannot wait for that bake off bake along session.

Before that happy moment, however, we’ve got the bread week bake along to get through. I’ve gone for teacakes, mostly because I found them a more interesting prospect than a cottage loaf and obviously I am not making a bread sculpture. And you know what? They were bloody delicious.

DSC_0146-1-1024x683

Source:

It seemed sensible to start with Paul’s Hollywood’s recipe, for obvious reasons.

Notes:

The recipe instructed me to make eight teacakes, so I obediently did so. But they were absolutely massive! Like pillows! I mean, worse things have certainly happened, but if I was making them again I’d divide the dough into ten pieces.

Ingredients

500g strong white bread flour
10g salt
60g golden caster sugar
1 tsp ground allspice
10g instant yeast
50g butter, softened
300ml tepid water
Flavourless oil for kneading, such as vegetable or sunflower
150g dried apricots, finely chopped
100g white chocolate, cut into small chunks
1 beaten egg, to glaze

Method

  1. I made all this in a mixer with a dough hook, because I am lazy. Pop the flour, salt, sugar, allspice, and yeast into your large mixing bowl. Add your butter and roughly three quarters of your measured water, and either begin kneading by hand or turn on your mixer. Gradually add more water until you end up with a soft (but not too wet or batter-like) dough – I found mine was perfect with all 300ml, but you may need more or less, depending on lots of factors like the absorbency of your flour. If you’re kneading by hand, tip your dough onto a lightly oiled surface and go at it until your dough is beautifully silky and smooth, probably around ten minutes. If you’re using a mixer, just let it do the work. Either way, lightly oil your bowl, cover it (I use clingfilm), and leave your dough to rise until at least doubled in size – a long, gentle prove will give your a better flavour in your dough. I left mine for two hours.
  2. Get two baking trays ready, lining them with silicone or baking paper. Pop your proved dough onto a lightly floured counter, and pull it into a rough rectangle shape. Scatter your apricots and white chocolate over it, and then roll your dough up like a swiss roll – I find this helps to get an even distribution of fruit and chocolate from the off. Knead the dough for a few minutes until it feels like the extras are well distributed.
  3. Weigh your dough, then divide it into ten equal pieces. Shape each into a ball, then place it on your baking tray and press it down gently with the flat of your palm to flatten it a little. Brush each with beaten egg, then place the baking trays into plastic bags and leave the teacakes to prove until doubled in size again – at least another hour. Heat your oven to 200C/ 180C fan/ gas 6.
  4. Bake your teacakes for ten to fifteen minutes (mine took twelve), until risen, golden, and smelling amazing. Cool on a wire rack or do what I did and eat immediately with butter.

This bake off bake along is not particularly great for anyone trying to eat healthily. I think all my bakes have contained chocolate so far. Although admittedly that’s my own fault.

DSC_0021-4

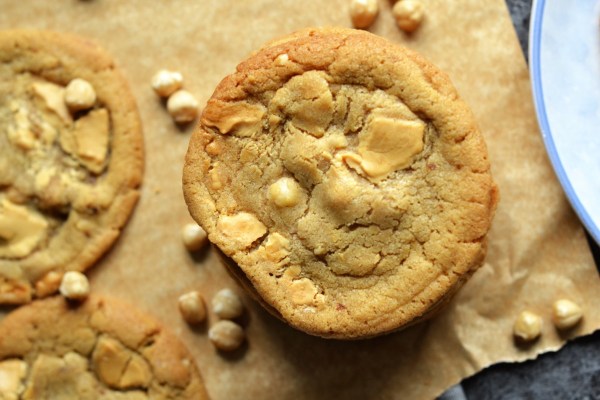
Caramelised White Chocolate & Hazelnut Cookies

I was going to do a completely different recipe this week, but we’ve ended up with caramelised white chocolate and hazelnut cookies, slightly by accident. In last week’s Taste Test post, I mentioned caramelised white chocolate in passing. I got a surprising number of reactions, ranging from ‘I have never found a white chocolate I like so I am intrigued by your caramelised white chocolate and don’t believe it will change my opinion’, to ‘Please post a recipe for caramelised white chocolate. Please.’

Lots of people are very opposed to white chocolate, and I can see why. There’s the old argument that it’s not really chocolate, as it contains no cocoa solids, being made instead of cocoa butter, sugar, and milk solids. Poor quality white chocolate is often blandly sweet. I would argue, though, that good quality white chocolate certainly has its place, and when caramelised it becomes a true delight.

DSC_0001-1-683x1024

When caramelised, white chocolate progresses beyond bland sweetness, and develops a deeper, warmer flavour. It reminds me of caramel (well, duh) and peanut butter. If you start with a good quality white chocolate (I’d recommend at least 30% cocoa butter) with a hint of vanilla, then add a good pinch of sea salt before caramelising, you get a grown-up treat.

You can then do any number of things with your caramelised white chocolate. If you leave it in liquid form, it makes an excellent ganache, an enhancing icing ingredient, or the beginnings of an amazing ice cream. You can also do what I did here: let it set solid, then break it up into pieces. That way, you can put it into cookies, use it to decorate cakes, or (let’s be honest) just straight up eat it. I won’t tell.

DSC_0040-1-1024x683

This is a twist on a basic chocolate chip cookie recipe I posted on the site ages ago. The main point of this post is to tell you all that caramelised white chocolate is amazing, but this is also a really great base cookie recipe that definitely deserves your attention. If I can’t convince you to jump on the caramelised white chocolate bandwagon, you can always use other chocolate and make the cookies anyway.

Source:

The base cookie recipe here is minorly adapted from The Violet Bakery, by Claire Ptak.

Notes: 

This recipe will yield around 20 generously sized cookies. They will keep well in an air-tight container for three or four days. If you have more willpower than we do.

Caramelised white chocolate is very easy to make, but it does take a little time. This time is basically all passive though – you just need to let it do its thing and check in now and then.

Ingredients: 

for the caramelised white chocolate

200g good quality white chocolate (I actually caramelised 400g so that 200g could go into the cookies and 200g could be reserved for other purposes)
good pinch of sea salt

for the cookies

250g butter, softened
200g light brown sugar
100g caster sugar
1 tsp vanilla extract or, if you have it on hand, vanilla bean paste
3 large egg yolks
325g plain flour
1 tsp fine sea salt
1 tsp bicarbonate of soda
100g blanched, toasted hazelnuts, roughly chopped

Method – Caramelised White Chocolate

  1. First, caramelise your chocolate. Heat your oven to 140C/120C fan/gas 1. Break your chocolate into pieces if it’s in a block, put it on a (clean, dry) baking sheet with a rim, sprinkle it with a pinch of sea salt, then pop it in the oven for 10 minutes to melt. Take it out, smooth it and spread it around with a (clean, dry) spatula, then pop it back in the oven.
  2. Keep going for around 40-60 minutes, taking it out and stirring it around every 10 minutes or so to ensure it’s caramelising evenly. It might look like it’s going lumpy or chalky, but give it a stir and it’ll sort itself out. Everyone’s oven is different so I can’t say precisely how long you want to keep going for, but you’re aiming for a peanut butter kind of colour. Keep tasting it! Stop when you are happy. You can see in my video below how the chocolate thickens and darkens – I’ve taken this one pretty slowly on a low oven, but you can push it a little faster if you’re confident.
  3. If you get to the end of the process and your chocolate has lumps you’re not happy with (more likely if you are using a chocolate with a low cocoa butter percentage) just pop it in a blender and give it a quick whizz with a teaspoon or two of flavourless oil. Never add water! If you want the chocolate solid, spread it out on baking parchment or silicone on a cool tray and leave it to set, or pop it in the fridge if you’re impatient.

Method – Cookies

  1. For the cookies, line a baking tray which will fit in your freezer with parchment paper. In your largest bowl or in a stand-mixer, beat the butter and both types of sugar together until just combined and even, then beat in the vanilla and egg yolks – all at once is fine. Add your flour, salt, and bicarbonate, then mix to form a stir, firm dough. Finally, fold in your hazelnuts, then break your white chocolate into rough pieces and fold them in too. I like to reserve a few pieces and press one into the top of each cookie.
  2. Using a small ice cream scoop, scoop the dough into cookies and pop them on your lined tray. You’ll have fairly large scoops of dough – mine were around 45g. Freeze for an hour, or up to a month.
  3. Heat your oven to 180C/ 160C fan/ gas 4, and take the cookies out of the freezer. Spread the frozen dough between three or four lined baking trays – you need to give them a lot of space to expand. Let them rest at room temperature for five to ten minutes while the oven heats up, and then pop them in. Bake for 15-20 minutes (it was 16 in my oven), until the outsides of the cookies are baked and crispy, but the insides still feel soft and underbaked. Let them rest on the counter to firm up for at least 10 minutes.
DSC_0011

White Chocolate, Cranberry, and Pistachio Fudge

So, it’s exactly one month until Christmas day. Also, it’s a month minus two days until my birthday, in case you were wondering. You weren’t? You don’t care about my neglected and forgotten ill-timed December birthday? How very dare you and so on.

I always worry about Christmas presents. I am slightly uneasy with the consumerist mindset of buying loads of people loads of stuff that they don’t necessarily want in an arbitrary way. I know there are dozens of local charities that need my money more than my uncle needs a new sweater. I mean, don’t get me wrong, I buy things and I like giving gifts: I think Christmas can be a great opportunity to treat someone to something they have been really wanting or needing. But the fact is that you don’t necessarily know everyone in your ‘gift circle’ well enough to get them that perfect, meaningful, useful, lusted after Thing. And you feel rude showing up to someone’s house empty handed, especially when you know that they will have bought you a present. So you panic (or I do, at least) and end up buying them some perfume, or a book, or a gift voucher. And it’s well-meant, and I’m sure it’s appreciated. But it’s not necessarily something they really needed or wanted. And don’t we all just have too much stuff anyway?

I am also, to put it mildly, not exactly burdened by the weight of huge wads of cash. I simply can’t afford to go buying glamourous and exotic presents for every person who I’d like to show I care about at this time of year. The obvious solution is to do what I did last year and make a load of food instead. Yes, you are correct: this is my solution to all problems. But it made sense. I spent days making lots of gift food and packaging it all up in hampers for friends and family. It was less expensive than buying everyone proper presents, and while you don’t know if people are going to have already read that book you bought them, you can be confident that at some point they would probably like to eat some food.

DSC_0022-1-1024x683

This year, though, I’m doubting myself. Don’t home-made presents stop being desirable and adorable once the giver is past the age of six? What if everyone already has far too much food at this time of year and they’re gritting their teeth and smiling politely while inwardly groaning at having even more to get through? Will I look like a cheapskate giving people this stuff when they’ve actually spent proper money on gifts for my husband and I? Surely people are sick of me giving them food when I literally do that all the time?

I don’t know. I don’t have the answers. There isn’t a proper conclusion to this post.

Except this recipe for white chocolate, cranberry, and pistachio fudge. This is the sort of thing that would make a charming and thoughtful gift for people around the festive season. Or would it? I don’t know. Help me.

It’s really tasty though. I can attest to that because I ate a lot of it this week. Well, I did before I had my wisdom tooth taken out. Now I can’t really eat anything.

DSC_0026-683x1024

Notes: Obviously you can add any fruit, nuts, or chocolate you like. But this, believe me, is a winning combination.

I have a thermometer for testing the temperature of meat and sugar and things like that. I’m not pretending it’s not useful here – they are not expensive and if you do any cooking on a regular basis they are a good investment – but you can most definitely make this fudge without a sugar thermometer if you don’t have one to hand.

This is actually an incredibly simple and easy recipe, but it does require your fairly undivided attention for around twenty minutes. Listen to a podcast or something while you stir.

Ingredients:

500g double cream
500g golden caster sugar (gives it a better colour and flavour, I think, but white caster will work if that’s all you have)
3 tbsp liquid glucose (this sounds like a frightening ingredient but Dr Oetker do tubes of it you can get from Sainsburys)
1 tsp salt
100g good white chocolate (I like Green & Black’s)
75 shelled pistachios
100g dried cranberries

Method:

  1. Put your cream, sugar, and liquid glucose into a big (this is important, a small one will not work), non-stick saucepan. Stir it all together and pop the pan on a low-medium heat so that the sugar can melt. Stir it occasionally (I find a silicone spatula works best for this) and make sure it’s not catching on the bottom. Meanwhile, grease and line a 20cm square tin with baking parchment. Chop your chocolate into big chunks. Chop your pistachios coarsely. Have your cranberries ready to go. Get a spoon and a glass of cold water and keep it by your pan, or get a sugar thermometer ready.
  2. When the sugar has melted and the mixture no longer seems grainy, whack that heat up and boil your fudge mixture hard. Now you have to keep stirring all the time. This is why a big pan is needed, because it’s a lot of mixture and it will be bubbling and splashing around and you don’t want it all over everything (especially your hands, because it will burn you – wear an oven glove if you are nervous). You need to keep bubbling it away until it reaches soft ball stage, or around 118C. To test for soft ball stage, spoon a little mixture into your glass of water and it should form a soft ball you can squidge between your fingers. It will take a good ten or fifteen minutes – depending on your heat and pan – to get to this stage, so make sure you have reached it or your fudge won’t set.
  3. When you’re there, take it off the heat. Stir in your cranberries, pistachios, and salt, and keep stirring for five minutes to let the mixture cool and thicken. Scatter in your white chocolate, stir roughly once, and immediately tip your fudge mixture into your lined tin and smooth it out – your white chocolate will melt and marble slightly, but if you over-stir it then it will just melt entirely into the mix (which will still taste good but look less pretty).
  4. Your fudge should start setting pretty much immediately. I left mine on the counter for half an hour, then froze it for half an hour, and it set completely in the hour. When you’re happy, cut it into squares. It will keep for a couple of months (as long as you don’t let me anywhere near it), but don’t leave it in the fridge because it will go soft.
DSC_0035

Malt Chocolate Banana Bundt Cake

Do you know what the difference between an introvert and an extrovert is? That sounds like it’s going to be the set up to a joke, but it’s not: I’m actually asking.

I thought I knew, until recently. I had a vague notion that introverts preferred their own company, and were often solitary and shy, while extroverts were confident and social by nature.

It turns out that definition isn’t accurate. Basically, as I understand it, introverts draw their energy from being alone, while extroverts draw their energy from being around people. An introvert, therefore, isn’t necessarily a solitary person sitting in a corner: they could be juggling fire and cracking jokes in the centre of the group while asking you to update them on that saga with your neighbour’s dog and simultaneously getting the drinks in. But not forever. An introvert isn’t likely to be in the last group of determined pub-crawlers, unwilling to stop talking and so trekking around town to find somewhere still open at 3am. An extrovert, on the other hand, thrives on the company of others: they enjoy social time and are likely to be bored by themselves.


DSC_00311-1024x683

I am a classic introvert. Even if I am enjoying an evening with a group of people I genuinely like being around, I can only stick it out for a limited amount of time before becoming socially exhausted. It will sound ridiculous, but was only relatively recently that I realised that this was okay. It took me a worryingly long time to see that it’s actually fine to be the first one to say ‘Right, that’s me! See ya!’, stand up from the table, go through the business of the hugs and farewells, and escape.

I think that our social practices tend to cater to extroverts. There’s a certain kudos to being the one out latest, to being the ‘life and soul’. When you get up to leave early, people sigh and groan and say ‘Oh come on! It’s only 10pm! Stay for one more drink’. But now I know that it’s fine not to. I have a reputation for being the first to leave, the one tucked up in bed while everyone else is contemplating round five and wondering if anywhere serves food at 11pm. I don’t mind being thought of as a bit pathetic: for me, there’s no fun to be had in staying out when all my social energy has been drained, and I know I’m not good company by that stage either.

In keeping with the practice of doing what makes you happy rather than what is expected (as long as what makes you happy isn’t, you know, hurtful to others or illegal), I made this cake.

I picked up this beautiful book, by Annie Rigg, pretty much by accident. I had twenty minutes to kill in town and wandered into the bookshop, and then mooched along to the cookery section, and then casually picked up a book and… I really wasn’t intending to buy anything, but I couldn’t leave it behind.

The book is full of gorgeous, elaborate, modern recipes, and I could have made something much more impressive if I’d had the time and inclination. But this was the cake that was calling me, so even though it wasn’t the healthiest, or the fanciest, or trickiest, I decided to do it anyway.

DSC_0107-1024x683

Source: Summer Berries & Autumn Fruits, by Annie Rigg. It’s great.

Notes: I originally made this cake exactly as it was in the book, only changing the toppings because I wanted something pretty to feed to a group. Although the cake was delicious, I didn’t get the malt chocolate flavour through as strongly as I would have liked, so I have slightly upped the quantities here. Nonetheless, besides some slight alterations and extra toppings, this is very much Annie Rigg’s recipe.

Don’t be put off by the long list of ingredients: you will probably have most of them in the cupboard. In fact, the part of the reason that I chose this cake was that I was short on time and didn’t want to have to go shopping for supplies.

Ingredients:

for the cake

200g softened butter, plus extra for greasing
25g cocoa powder, plus extra for dusting
260g plain flour
40g malted milk powder (such as Ovaltine)
2 tsp baking powder
1/2 tsp bicarbonate of soda
pinch of salt
125g soft light brown sugar
100g caster sugar
4 large eggs, beaten
4 medium bananas, very ripe
3 tbsp sour cream, room temperature
1 tsp vanilla extract
50g dark chocolate, chopped

for the frosting

100g soft light brown sugar
100g dark muscovado sugar
75g butter
125ml double cream
50g dark chocolate, chopped
pinch of salt

extra toppings (optional)

bag of maltesers
1 firm banana
25g white chocolate

Method:

  1. Preheat your oven to 180C/ 160C fan/ gas 4. Grease a bundt tin with butter and dust with cocoa powder. The recipe suggests a 2.5 litre bundt tin, but I have no idea how big my tins are in litres (!?), and I only have one bundt tin anyway, so I went with that and it was fine. In a large bowl, sieve together the cocoa, flour, malted milk powder, baking powder, bicarbonate of soda, and salt.
  2. In another bowl, cream together your butter and both sugars. Add the beaten egg gradually, mixing until it’s even. Tip your dry ingredients into the bowl with the butter, sugars, and eggs. In the bowl that you were using for the dry mix (no need to wash it), mash the bananas, and then add the sour cream and vanilla and mix to combine. Tip this into the bowl with everything else and mix it all together. Add your chopped chocolate and fold it in.
  3. Pop your mixture into your tin, and bake for 30-40 minutes. Let the cake rest in the tin for two minutes (and no more), and then carefully turn it onto a wire rack and leave to cool completely.
  4. For the frosting, heat both sugars, butter, and cream gently in a saucepan until the butter is melted and the sugar dissolved. Simmer for 30 seconds, then remove from the heat and add the chocolate and salt. Stir until smooth, and then pour it gently over your cold cake.
  5. If you want to get overly complicated, like I did, top the cake with dried banana slices, maltesers, and grated white chocolate.

Enjoy a piece on your sofa, alone at 10pm on a Saturday night, reading a good book, watching your favourite TV show, or simply being content in your own company.

(Then probably take the rest of the cake out to share with friends, because it’s huge).