DSC_0083

Pesto, Bacon, and Mozzarella Bread

A good time to make this Pesto, Bacon, and Mozzarella Bread would be when you’re planning to feed a crowd. Possibly you have a big family. Maybe you are inviting friends over. Perhaps you need to feed hungry work colleagues. In all of those instances, this bread would be an excellent thing to bake. A slightly insane time to bake this massive bread is when there are only two of you in the house. And you just kind of fancied a bit of bread. But, of course, that’s what I did.

To give you an idea of the scale of this bread: it only just about fit in my oven. I had to cut it up for the photos. If left whole, it didn’t fit on the board, or actually even into the shot when I was trying to take pictures.

In other words, it’s awesome. A ridiculously huge loaf of bread filled with pesto, bacon, and mozzarella? What’s not to like?

This is an ideal weekend project. Pop the dough on when you get up, and then gently potter around, finishing it off in time for a luxurious brunch. Yes, it takes quite a long time, but most of that time is just passive while you’re waiting for it to prove. And there is really nothing more satisfying that making your own bread for scratch. As this particular bread is stuffed with tasty fillings, you don’t even have to had anything with it. Although it would make some epic sandwiches.

DSC_0044-1-1024x664

DSC_0060-1024x683

DSC_0062-2-1024x683

Notes:

I made the dough for this in a mixer fitted with a dough hook. You could do it by hand, but the dough is essentially a brioche. It’s very wet and a bit of a pain to get all the butter in by hand. They made us do brioche without a machine at culinary school, obviously, but… yeah. It’s not an experience I am massively keen to repeat.

Ingredients:

500g strong white bread flour, plus extra for dusting
10g salt
10g dried yeast (from sachets is fine)
150ml warm milk (heat it for around 30 seconds in the microwave until it’s about skin temperature)
3 eggs
200g butter, room temperature, cut into cubes
300g bacon lardons
150g pesto, fresh if you can get it
2 x 150g balls mozzarella, drained
1 egg, beaten
handful of parmesan, grated
fresh chives to finish, optional

Method:

  1. Put your flour, salt, yeast, milk, and eggs into the bowl of your mixer. Beat with the dough hook on a medium speed until it’s smooth. Slowly – over about a five minute period – add your butter, bit by bit, letting each chunk get beaten in before adding the next. You should have a glossy dough. Pop it into an oiled bowl. Cover with cling film. Leave to rise in a warm place until doubled in size (at least an hour). You can also do this step the night before you want your bread, and let it rise overnight in the fridge.
  2. While your dough rises, pop your bacon into a frying pan on a medium heat (no need for oil). Gently fry it until cooked but not too coloured – it will cook more in the oven and if you get it too dark now it will only burn later. Tip it onto kitchen roll to drain excess fat and let it cool.
  3. When your dough has risen, line your largest baking tray with baking parchment or a silicone mat. Sprinkle it with flour. Carefully tip your dough out onto it, then, with oiled hands, gently press it out into a rectangle about 1cm thick and roughly 45cm long, with the long side facing you. Spread the dough with your pesto, scatter it with your bacon, and tear up your mozzarella into strips and lay it over the top. Roll it all up from the long end like a sausage. This is the best way to make sure the filling is evenly distributed. Join the ends of the sausage together to make a ring. It’s a delicate dough with a lot of filling so inevitably bits will tear and spill out as you move it, but this is good, because those bits will be exposed to the heat of the oven and taste delicious. Put your baking tray into a plastic bag and leave your bread to prove for another hour.
  4. Heat your oven to 220C/ 200C fan/ gas 6. Brush your bread with beaten egg, scatter the whole things with grated Parmesan, and bake it for around 25-30 minutes until golden brown. Keep an eye on it, because the enriched dough can catch and burn – if it’s starting to look too dark too early then cover it with foil.
  5. When your bread is baked, let it rest for ten minutes. Finish with a sprinkling of chopped chives, for colour, if you like. Enjoy warm or cold.

DSC_0079-1024x683

DSC_0090-1024x683

DSC_0073-1

The Bake Off Bake Along: Cumberland Rum Nicky

Is there even any point in talking about the baking this week? I know it’s the bake off bake along, and I do have some pictures of a Cumberland Rum Nicky to show you, but really, who cares about that now? I know I was cross last week, but that’s nothing compared to how I feel today.

We were sad when Julia left. We were shocked when Yan was sent home. But when Liam was booted off the Great British Bake Off, the nation agreed that it was the absolutely last straw and we were done, done I say, with the Bake Off. I mean, obviously we’re still watching it next week, but we won’t be bloody happy about it.

Honestly, I don’t want to be one of those people who is nasty about other people who are in the public eye on the internet. I really like Kate. She’s funny and interesting and obviously has a lot of baking knowledge. Of course, you only ever see the edited version of what’s actually happened when you watch something on television, and perhaps the impression the public are getting is incorrect. But it really did seem like Kate should have left the week Julia left, the week Yan left, and definitely the week Liam left. I mean, she dropped her Bedfordshire Clanger on the floor and then served them raw and she’s still in. And that’s on top of having several bad weeks. I mean, it’s just weird, isn’t it? I literally gasped in shock when Liam’s name was announced, and then I watched Twitter go absolutely mental.

Now that all my favourites have left the tent, I don’t even know who I’m rooting for. Sophie probably? She’s good. I like her. But I don’t know anymore. I feel like if I decide to like someone they are immediately going to get chucked out.

DSC_0053-683x1024

The Recipe

I was really quite tempted to give the Bedfordshire Clangers a go for this bake off bake along, but, as usual, I didn’t have time to do anything fancy. So I went for the Cumberland Rum Nicky. And you know what? It’s quite nice. It feels like a very Christmassy recipe for some reason. Actually, that reason is probably because I used spiced rum. Anyway, please ignore the fact that my lattice work looks like it was done by a particularly incompetent four year old child. I’m not great at intricate fiddly things at the best of times, especially when I’m rushing, and it seems like baking pastry only amplifies imperfections that don’t seem so bad when it’s raw.

DSC_0082-1024x683

Of course, it was only right and proper that I used Paul’s recipe for this Cumberland Rum Nicky. I mean, to be honest, I don’t think there’s another version I can use in any of the recipe books I’ve got knocking about. No complaints. It’s all pretty simple. It seems a bit odd that the pastry isn’t glazed in the recipe, particularly because it looks glazed in the photo, but not the end of the world.

Liam leaving though. That was the end of the world.

DSC_0019

Review: Dolce Twenty Subscription Box

You might not believe it from looking at this blog, but I do try to find some semblance of balance with food. Yes, I do of course eat chocolate, drink wine, and devour a range of baked goods both impressive and frightening in scope. But I also eat plenty of fruits and vegetables, protein, whole grains, and healthy fats. I don’t believe in denying yourself access to certain food groups (unless out of medical necessity): that’s just going to end with you face-down in a family size sticky toffee pudding with a tub of Pringles in one hand and a bottle of gin in the other, feeling bad about yourself.

I’ve always believed in the 80:20 rule: if you eat healthily 80% of the time, you can indulge for 20% of the time. Yes, it’s often not so simple in practice, and there are definitely times when my ratio has been more like 50:50… or 30:70… well, we don’t have to go into it. But, in essence, I’m on board with the cliched but sound maxim: everything in moderation. That’s why I’m very into the concept behind new monthly subscription box service, Dolce Twenty.

DSC_0001-1-1024x683

Dolce Twenty champions the idea of choosing quality over quantity when it comes to indulgent foods: if you’re going to have a treat, then make sure it’s something you’re going to really enjoy. Their subscription boxes curate products from artisan producers across the country. The idea is that you get to discover new products and brands, as well as enjoying high quality sweet treats. I am totally on board with this. If I’m going to have a brownie, I want it to be a completely blissful brownie, rather than a dry and dusty disappointment. You’re much more likely to binge your way through your baking cupboard (what do you mean not everyone has a baking cupboard?) if you’re not feeling satisfied with your snacks to begin with.

s-Hippie-Party

Dolce Twenty currently offer three different subscription box sizes – mini, small, and sharing – to suit a variety of households and budgets. I was lucky enough to be sent a sharing box to road test. What a treat it was to find a tempting box full of delightful treats in the post for a change (alongside bills and junk mail, of course, because life isn’t kind enough to only send you confectionery in the post).

In the spirit of saving luxuries, I haven’t worked my way through the whole box yet. Believe me, that shows an impressive degree of restraint on my part. But everything I have tried so far was delicious. I let a friend have a piece of the Dark Chocolate and Sea Salt Fudge (because I’m kind), and she agreed with me that it was particularly tasty. My favourite discovery has been Coco Chocolatier, an Edinburgh-based chocolate company. Their sample in the box was exceptional, and they also have some of the prettiest packaging I have ever seen in the chocolate world. I’m looking forward to working my way through the rest of the box over the coming weeks (okay, fine, days).

If I have one criticism, it’s that the box was quite heavy on fudge (three fudge products), and I wouldn’t have minded a bit more variety. I absolutely love fudge, but my husband isn’t a fan (I know! He says it’s too sweet!?). Luckily I was there to nobly eat his share of fudge, because I’m a wonderful person, but having three varieties of one type of product could be an issue if that product isn’t something you love. That said, Dolce Twenty are a very new company and they are still building relationships with their suppliers, so I am sure that, as time goes by, their selection of sweet treats will only expand and become more varied. And it was very tasty fudge.

All in all, I think Dolce Twenty are a great start-up business. I’m looking forward to seeing how they grow and develop. And in a world where everything often seems a bit rubbish these days, I think it’s a relief to occasionally get home from work and find a box of sweet treats waiting for you.

*I was kindly provided with a free sharing box from Dolce Twenty for the purposes of this review, but all views are, as ever, my own.
DSC_0069-1

Chocolate Caramel Skillet Cookie

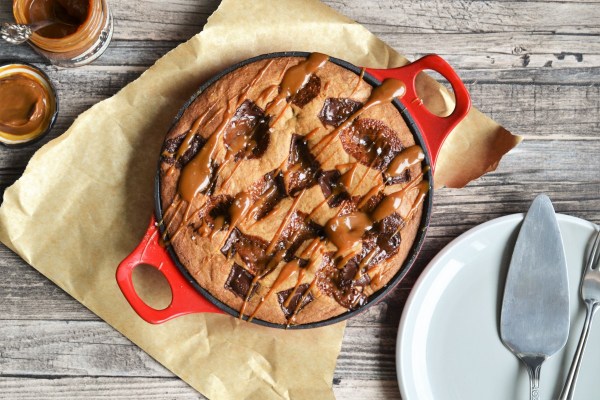
I’ve seen pictures of skillet cookies all over the internet for ages, and I’ve always been a bit scared of them, conceptually. And, thinking about it, it’s only because the term skillet kind of confused me. I always sort of thought I didn’t have a skillet. But it turns out that a skillet is just a frying pan. I have lots of frying pans. All you need for this is a frying pan you can put in the oven, and then you’re away. There is very little standing between you and a giant chocolate caramel skillet cookie right now.

DSC_0067-1024x683

The joy of this recipe is that it’s incredibly easy. It’s actually simpler than making regular cookies (which is pretty simple anyway), because you don’t have to bother with shaping individual balls of dough, or with chilling your mixture down. It’s quicker than most cake batters. It bakes up very quickly in the oven. And then you don’t have to bother with turning it out, like a normal cake. The charm of the chocolate caramel skillet cookie is that you can serve the whole thing at the table. Or, er, on the sofa. You know, if you were eating it by yourself. Which obviously you wouldn’t do. Nope.

DSC_0111-1-683x1024

It’s called a cookie, but really this is a bit of a cake and cookie hybrid. The texture is not quite cookie, but not quite cake either. Or, to put it another way, it’s the best of both worlds. Cookie and cake in one. What more could you ask for?

DSC_0116-1024x683

Notes:

As with any cookie, you can add whatever you like to this. I have kept it simple here, but any chocolate you have would be lovely in this recipe, as would the addition of nuts.

I had a jar of dulce de leche to hand, but caramel would work too, and you could of course make it from scratch (my recipe is here, if you like).

I didn’t grease my skillet because it’s non-stick, but if yours isn’t then I advise greasing it well with butter.

Ingredients:

150g butter, cubed
100g brown sugar
50g caster sugar
1 egg, whisked
1 tsp vanilla extract
230g plain flour
1 tsp baking powder
pinch of salt
100g 70% dark chocolate, roughly chopped
50g caramel or dulce de leche

Method:

  1. Heat your oven to 190C/170C fan/ gas 4. Melt your butter and both sugars together in a large saucepan gently, then take off the heat and let cool when combined.
  2. Whisk your egg and vanilla together in a small bowl, then stir it into the butter and sugar mix, making sure the butter isn’t too hot (you should be able to comfortably put your finger into it). Sieve your flour, baking powder, and salt over the mixture, and stir to combine.
  3. Spread your cookie mixture into medium skillet (mine was 20cm diameter), then press chocolate chunks into the top and dot with spoonfuls of caramel. Bake for around 15-20 minutes, or until the top of the cookie is golden and crispy,  but the inside is soft. Finish with a drizzle more caramel and a sprinkle of sea salt, then let everyone dig in. It’s great with ice cream too.
DSC_0051

The Bake Off Bake Along: Cannoli

I have very strong feelings this week. Some of these feelings are related to the fact that Yan definitely should not have left the tent. I adore Yan and I would have been very happy if she’d have won. I really like Kate too, but I think she was weaker than Yan for Italian week and has been struggling for a little while, as has Stacey. It seems ridiculous than Yan went out, so much so that I got quite cross with Paul and Prue. But the bake off bake along must go on, and cannoli are happening.

DSC_0075-1024x683

This is the other thing I have strong feelings about this week: what they made in the tent. I felt like it wasn’t a great episode and the challenges didn’t hang together very well. Sfogliatelle didn’t seem like a great showstopper assignment, really, because most people don’t know what they are and don’t have a chance of making them, and because even when they’re made correctly they just don’t look very interesting. Pizza is too simple and dull for a technical challenge, especially when you have the bakers just make a margherita. I mean, pizza is great, but I’ve made it so many times that it’d be no fun for me to do as a bake along. And there didn’t seem to be much leeway given for the fact that it was stupidly hot in the tent. Also, with the budget for this show, surely they can afford to air-condition the marquee? Or put in big fans? Or even just open the sides?! It’s almost like they’re trying to make the bakers suffer.

DSC_0094-1024x683

But. But. The thing that redeemed this episode for me is that it included cannoli. I love cannoli. I have said it before and I will say it again. They are one of my absolute favourite desserts. But I have never made them before, because they look really hard. I don’t have a deep fat fryer. And you have to have cannoli tubes, and who has those?

Well, me. Now I have those. I purchased cannoli tubes for this bake off bake along. Which is nuts. But this felt like the time to finally bite the bullet and do it, because I have always wanted to be able to make cannoli myself.

Not going to lie: making cannoli is fairly labour intensive. It also requires quite a bit of kit. The dough itself isn’t too hard to put together, but then you need a pasta machine to make it thin enough to work with. As with fresh pasta, yes, you could use a rolling pin, but it would take a lot of time and effort to get the dough as thin as it should be. You’d then have a much easier time of it if you had a deep fat fryer. I don’t, so I just deep-fried my cannoli tubes in a pan of oil on the hob, and kept an eye on the temperature with a sugar thermometer, but it was quite hard to regulate and a fryer that kept a consistent temperature would have been so much easier. Finally, you do need cannoli tubes. Luckily they’re really cheap, but I did have to go to the effort of actually ordering them online.

So, all in all, this was a stupid thing to do. But they were so tasty. I was very proud of my little cannoli shells, which bubbled and went golden and crisp, exactly as Paul and Prue had said they should. I feel like making cannoli in and of itself was enough of a challenge, so I haven’t made three different types. I sort of intended to, but when it came down to it I just ran out of time. I stuck with classic flavours: ricotta; mixed peel; dark chocolate. Happy days. They were really delicious, and I was actually quite proud of myself, which I’m not usually after these bakes!

DSC_0116-1-659x1024

The Recipe

Obviously I didn’t have a clue what I was doing here, so I slavishly followed this recipe. It all seemed to work without any issues, although I did end up adding some extra flour to the dough, because it seemed a bit too sticky and difficult to work with at first. I also dipped the ends of the cannoli tubes in chocolate because… well, because dipping things in chocolate means never having to give a reason.

Sadly, cannoli don’t keep very well, because as soon as you pipe the ricotta mix into the shells they start to soften and go soggy. It just means you have to eat them all very quickly. Which is tragic, obviously.

DSC_0048

The Taste Test: Peanut Butter

I’ll be the first to admit that I got a bit carried away with this taste test. It’s peanut butter, okay? It’s special. Some of you will understand and agree, and some of you will think I’ve lost my head. Never mind. We can’t all be right. James is a bit lukewarm about peanut butter, which is probably a good thing, really. His restraining influence is what stops me from having peanut butter at all three meals in a day. I mean, it’s a miraculous ingredient when you think about it. It can be used to good in savoury or sweet dishes. It’s also perfectly lovely on its own. Eaten by the spoonful. From the jar. No, you have a problem.

Anyway. Apart from liking crunchy peanut butter (because obviously), I’m not massively loyal to one particular brand. I like trying out new varieties. This is probably why I got a touch carried away and ended up buying, um, eight samples instead of the usual five. I just kept seeing jars of the stuff everywhere and thinking ‘Ooh, I’ve not tried that one yet!’ I am, unfortunately, a greedy and impulsive food shopper.

It was actually a great call for a taste test though (thanks Phoebe!) because there’s so much variety between different brands of peanut butter. Who knew!? Considering peanut butter is basically just blended peanuts, there’s a lot of different ways to make it, depending on ratios of peanuts to oil to salt. By the end of this taste test, I was slightly lost in the peanut butter wilderness. But very happily so.

As before, I feel I need a rambling disclaimer: obviously, I am doing this in my kitchen and not in a lab and I am not a scientist. These are the opinions of one person – that said, one person who has been trained to taste for quality. Also, the products used in this series are just examples – obviously each supermarket has, say, eight or nine different types of peanut butter or whatever the product may be, and I’m not going to try every single one because what am I, made of money?

Finally, I should highlight that I tasted all the products blind, and at the time of tasting and making my notes I didn’t know which product came from which shop. I sat in one room while my glamorous assistant (er, my husband), prepared the samples in another. Any notes added regarding packaging and so on were only done after blind tasting, when I learned which supermarket had made A, B, C, D, or E.

The Blind Taste Test: Peanut Butter

DSC_0088-1-1024x683

Peanut Butter
per 100g
£
kcal
fat
carb
fibre
protein
salt
Meridian
0.71
596
46
11.6
8.5
29.6
0
Whole Earth
0.79
643
54.3
7.4
6.7
27.7
1.1
Waitrose
0.59
619
51.0
5.8
9.9
29.4
0.8
Sunpat
0.69
671
48.7
14.5
7.3
24.8
1.0
Pip & Nut
1.02
622
49
13
27
0.51
Grandessa – Aldi
0.29
612
49
15
7.2
25
0.81
Pic’s
0.92
590
48.4
9.6
7.7
30.3
0.5
Tesco
0.38
634
53.4
9.6
9.2
24.2
0.7

A – Whole Earth – 8/10

  • Very firm, reasonably dark in colour. Not separating. Crunchy, but with very small pieces of peanut – flakes rather than lumps. Includes little pieces of peanut shell, which give it a nice roasted flavour. Good level of saltiness. Nice peanut butter. Maybe a bit too thick.

B – Sunpat – 7/10

  • Much more golden and visually a bit chunkier than A. The bigger bits of peanut and suspended in a much lighter, creamier mixture, while A was almost a paste. Doesn’t coat your mouth or taste claggy – melts away. Flavour not as nice as A, could be saltier, but lovely texture.

C – Pic’s – 6/10

  • Quite separated – oil puddling on the spoon. Mixture left holding together well. Coats your mouth. Small-ish chunks of peanut. Not quite as much flavour as A and B, not salty enough.

D – Grandessa – Aldi – 7/10

  • Dark golden in colour, holding itself together very well – very firm texture. Creamy, with a nice saltiness. Not too claggy but not disappearing or melting away. Good chunks of peanut. A nice middle ground.

E – Tesco – 6/10

  • Very pale, maybe the palest. Holding itself together well, no separation. Big chunks of peanut. Quite salty, but also a bit sweet, compared to the others. Fairly creamy. Stays in your mouth a little, but not claggy.

F – Pip and Nut – 5/10

  • Interesting – looks completely different to almost all the others. Not just separation, but a very loose texture altogether. The peanuts taste really good, but it’s too runny – you want it to stay in the mouth more. Peanut butter needs more heft than this!

G – Waitrose – 6/10

  • Golden, quite dark, holding itself and keeping shape on spoon well. Both creamy and light, with a good mouth-feel. Not as good a flavour as some of the others, but a nice texture.

H – Meridian- 4/10

  • Big chunks of nut, quite a lot of separation, quite dark. Very claggy, coats the mouth. Not very much flavour – doesn’t taste salty enough, or even strongly enough of peanut.

Conclusion

So my winner here was Whole Earth – near the middle of the road, pricing wise – with honourable mentions to cheaper Sunpat and much cheaper Aldi. I was worried that with eight samples I would be completely overloaded and lose track, but actually, they were all incredibly different.

The interesting thing to note is that, for me at least, this was not a taste test where the most expensive products excelled. Generally, the pricier peanut butter has much nicer packaging, and also boasted more natural ingredients. However (sadly?) healthier here did not equate to tastier. Whatever they put in cheap peanut butter – lots of salt and oil, I’m afraid – just tastes better to me. Maybe I have an unsophisticated palette, but something like Pip and Nut, which had a great flavour, let itself down by being almost watery. You can see very easily from the sample on spoon F – you’d need to ladle this stuff onto your toast rather than spreading it.

Meanwhile, the stuff I thought tasted best – A, B, and D – all held its shape well on the spoon. I don’t know if this is a controversial opinion (I might get comments crying ‘no!’) but I actually like my peanut butter to coat the mouth a bit, and have a bit of weight and texture. If it just melts away then, well, you don’t get to enjoy the delicious peanut taste for long. And that’s sad. In a world so full of disappointment, let’s enjoy the things we do still have power over. Let’s get the cheap, sticky, delicious peanut butter.

DSC_0062-1

Miso Ramen with Yutaka

This little packet of miso ramen noodles from Yutaka is a godsend if you’re after a quick and healthy meal. You know those days when you need to eat dinner within ten minutes or you’re going to have a bit of a meltdown? No? Just me? Anyway, even if you’re able to deal with hunger like a reasonable adult, these miso ramen noodles are a great meal option. The noodles cook within three minutes, and come with a little sachet of miso, so you’re pretty much ready to go.

I’ve worked with Yutaka before, and I love their products. If, like me, you don’t know that much about Japanese food, their ingredients are a great start. They’re very accessible, and often contain handy recipe instructions on the packaging.

DSC_0050-1024x683

Obviously, the joy of this sort of dish is that you can add whatever you like. Here, I have gone for tofu and asparagus, along with the base flavours of chilli, ginger, and coriander, for a light meal. However, you could add leftover cooked chicken or pork, or top with a soft-boiled egg, or add any vegetables you like. This is a great way to use up odds and ends in the fridge.

DSC_0072-1024x707

Notes:

This recipe will make one bowl of noodle soup – you can scale up as needed depending on how many people you’re feeding.

I’ve added some soy and mirin to my miso soup base for an additional flavour dimension, but if you want to make the recipe even simpler you can skip those too.

Ingredients:

1 bundle of Yutaka noodles
1 sachet of Yutaka miso soup
a dash of soy sauce
a dash of mirin
1/2 a fresh chilli, finely chopped
handful of asparagus, finely chopped
small chunk of ginger, grated
1/2 block of tofu, cubed
handful of fresh coriander, finely chopped

Method:

  1. Pop your noodles into a pan of boiling water for 3 minutes to cook. Put your sachet of miso into your serving bowl, and add boiling water from the kettle to fill the bowl. Taste, and add soy and mirin if you like.
  2. Chop your chilli and asparagus, grate your ginger, and cube your tofu. Finely chop your coriander. Drain your noodles when cooked.
  3. Add all of your ingredients to your soup bowl, and season to taste if you feel it’s needed. Eat immediately, while it’s hot.

DSC_0097-683x1024

DSC_0007

The Bake Off Bake Along: Portuguese Custard Tarts (Pastéis de Nata)

Whoa, that’s a long blog post title. On the plus side, I have had to write out the phrase ‘Portuguese Custard Tarts’ so many times this week that I can finally spell Portuguese without second-guessing myself. Thank goodness for the bake off bake along, eh? I (along with the nation, I imagine) was really sad to see Julia go this week. She was so awesome and, although I admit she had a bad week, I didn’t think it was going to be her in for the chop. Even though we’re well into the competition now, I still wouldn’t like to place bets on who is going to win. I quite like that there doesn’t seem to be an obvious front-runner anymore.

Is it just me, or does ‘make four separate but thematically connected savoury pies elaborately decorated with intricate shortcrust pastry designs’ seem more like a showstopper than a signature challenge? I mean, what? And although the the showstopper itself was right up my alley, I couldn’t quite find the time this week. I had a very busy weekend so, as usual, I was planning to take the path of least resistance with the bake off bake along. Which seemed like it would be the technical challenge. I know, I’m a fool.

DSC_0006-1024x683

I realise I sound very lazy in these posts. Don’t get me wrong, I am joining in… I’m just not making the maximum level of effort. I even (whisper it) bought my puff pastry this week instead of making it myself. I know. But, in fairness, I was planning to make it myself, until I looked up recipes for Portuguese Custard Tarts, and every one of them included some variation on the words ‘unwrap your package of pastry, roll it out…’. Who am I to argue?

DSC_0021-1-1024x683

And the recipe?

I am not going to recreate the recipe here, because I didn’t change it at all. It would seem a bit disingenuous to put it on my own blog. I worked from this. Portuguese Custard Tarts didn’t really seem like the kind of thing you can mess around with to add your own individual twist. Also, I had no idea what I was doing.

DSC_0031-1024x683

By the way, these are actually quite difficult. I thought this would be pretty simple (I mean, I’ve made regular custard tarts! They were fine!), but they were a bit of a nightmare. Maybe it was the recipe I was working from, but this was the faffiest custard I have ever made. Also, perhaps you just need to have a very particular type of oven, but mine didn’t bake up quite as they were supposed to. I didn’t get the perfect blistered dark spots on the top of the custard. I wish I had a blowtorch. My pastry was right on the edge of burning, though, so I couldn’t leave the tarts in the oven for longer in the hope of getting that caramelised top.

Anyway. I’m feeling a bit ‘meh’ about this week. Not my favourite bake along ever, by any means. Still, next week is Italian week, so how bad could that really be?

20170930_133111-e1507059021635

Review: The Porterhouse, Oxford

When my husband and I dropped into The Porterhouse for a Saturday lunch, I wasn’t intending to review the place. But we decided pretty immediately that the pub was worthy of a full write-up. Oxford has been in need of a great steak spot, and I’m pretty sure this is it. The Porterhouse has been put together with thought and attention to detail, and deserves to thrive.

We visited on a Saturday lunchtime, when the pub was quiet. It’s only been open for a few months, and they’re obviously still building up their customer base. As they’re tucked away down a residential side-street, you’d be unlikely to notice The Porterhouse unless you went looking for it on purpose. Once you make it there, though, you’ll be happy with what you find. The building has been renovated, and decorated with a careful eye: the dark blue walls, buttery leather banquettes, and  alternating warm wood and gleaming chrome tables all work together to give a warm and welcoming impression.

ARISIAN

There’s a dining room area, which is slightly more formal, and the main pub room, which has a beautiful bar and is dog-friendly. We settled into a cosy leather booth in the dining room and got stuck in to the menu.

The pub has an extensive drinks selection. There’s beer, obviously, but also a carefully curated wine list, a selection of decent whiskeys, and (to my delight) some really excellent cocktails. I don’t drink beer, so it’s always a disappointment to me when a pub doesn’t really offer anything beyond beer and mediocre wine. Since cocktails were on offer, James had a Bloody Mary (he was feeling delicate), and I had a Campari Spritz and, later, and Old Fashioned.  The drinks were all well-balanced and made with quality ingredients, and were enjoyed rather too quickly by us both.

20170930_131552-e1507058878946-768x1024

20170930_131610-e1507058917561-768x1024

Obviously, with a name like The Porterhouse, you can expect steak to feature fairly heavily on the menu here, and they don’t disappoint. A comprehensive steak menu board features the changing cuts on offer depending on what’s best from their supplier at Smithfield Market. All are served with chips and salad with options of varying sauces and additional sides. That said, if you were dining in a mixed group where not everyone was a steak eater, you’d still be grand as they offer some fish and vegetarian options, as well as some non-steak meat dishes such as poussin or a mixed grill. We were also told that, with a little notice, they’ll do vegan food. Top marks from me: I eat everything, but I do have plenty of vegan friends and it’s good to know you could feed a varied crowd here too.

That being said, we were not there for vegan food. We were there for steak.

20170930_130738-1024x768

James had a medium ribeye with the requisite chips and salad, and a pepper sauce. I went for a rare fillet, with a bearnaise sauce. The meat at The Porterhouse is dry aged for 42 days, then cooked in a charcoal-fuelled Bertha oven that can reach 350C, and wow, does it pay off. The steaks delivered to our table smelled incredible and looked very tempting: plump and juicy with a gorgeous outer char. Both of our steaks were cooked very well.

I am picky about steak, because it’s so easy to do wrong and so delicious when it’s done right, and I was totally happy here. The meat had a real depth of flavour and a meltingly tender texture. The salads were simple yet considered – fresh, and lightly dressed – and the sauces were bang on. The chips, while definitely good, were not the best I’ve ever had – but this is a minor quibble on what was a fantastic plate of food. Everything was seasoned to perfection and it really made the simple flavours shine.

20170930_133111-e1507059021635-768x1024

James (lightweight) couldn’t manage pudding, but I have never turned down a dessert menu and I wasn’t about to start just because I’d eaten a steak the size of my face. The list was short but sweet (see what I did there?) and I would have happily devoured any of the options. My usual M.O. is to go for whatever the chocolate option is (in this case, a fig and bourbon brownie), but there were other tempting things on offer.

Lovely Chris, who was serving us, noticed my quandary, and very kindly brought me a little portion of the brownie to try while I made my decision, so that I was free to pick another option, having sampled ‘the chocolate thing’. I know brownies, and believe me, this was an excellent brownie. Rich, dark, fudgy, and full of flavour and texture from the bourbon and fig. I’ll definitely order it again when I go back. The dessert I actually got, in the end, was the rhubarb and ginger crumble, which was served with a perfect custard and was also exemplary.

20170930_140503-1024x768

The Verdict – The Porterhouse

I am fairly particular about restaurant food these days – especially simple dishes where there is no room to hide – and I thought that the food at The Porterhouse was top-notch. The service also deserves a mention: Chris was friendly, knowledgeable, generous, and attentive without crowding us. They also have rooms on the upper floors, which we got a sneaky peak into, and they’re lovely – tasteful, comfortable, and immaculate. It’s exactly the sort of place I’d recommend to anyone coming to Oxford to stay. In essence, The Porterhouse provides classic British grill fare, but it does it very, very well. If you’ve not tried it yet, get a move on.

DSC_0032

Tomato Bruschetta

A quick post today, for a very simple recipe. Tomatoes on toast. Yes, really. But believe me, this is much more delicious than I am making it sound. I have even fed it to people who don’t like tomatoes, and they’ve asked me for more. Tomato bruschetta might not be an original idea but, when they’re done right, sometimes you just can’t beat the classics.

DSC_0002-1-1024x683

The choice of bread is crucial here. You may be tempted to go for a sourdough or a baguette, but I’d advise against anything too crusty. You don’t want to have to be pulling and tearing to get a mouthful, and end up with a heap of tomato bruschetta in your lap. Instead you want a pillowy, yielding bread, ideally fried gloriously golden to give it a perfect crispy exterior and a soft, warm interior. Something simple. If I’ve got the time, I do make my own bread for this, but a decent sandwich bread will do you fine. Buy it whole and slice it generously.

DSC_0052-1024x683

This recipe is all about using simple ingredients that work well together, and letting them do the heavy lifting for you. My kind of cooking.

Source:

This is my version of something we used to make at the cookery school, and since it’s Italian, I am assuming it came from the lovely Amelia Earl. She’s setting up a beautiful cookery school and bed and breakfast in Yorkshire, which you should definitely check out if you’re at all into food, gorgeous scenery, or nice people.

Notes:

Don’t worry too much about weights and measures here. This tomato bruschetta will work perfectly well even if you’re not too precious about quantities. Just taste as you go along to make sure you’re happy.

If you have leftover tomato mixture after making this recipe, then you can pop it in the fridge and keep it for a couple of weeks, using as needed. It’s great on pizza or pasta too.

DSC_0035-1-1024x683

Ingredients:

Around 1.5kg of fresh tomatoes, of any shape or size
A bunch of fresh basil leaves
Plenty of extra virgin olive oil
Salt and pepper
Balsamic vinegar (the good stuff, not balsamic glaze or dressing)
3 fat cloves of garlic, 2 crushed and 1 whole
A knob of butter
A loaf of the bread of your choice (see above for details)
A ball of mozzarella

Method:

  1. Chop your tomatoes any old how (large chunks are fine) and put them in your largest saucepan. Add a handful of picked fresh basil leaves, reserving some for later, a generous glug of olive oil, plenty of salt and pepper, a drizzle of balsamic vinegar, and two of the garlic cloves (crushed). Mix everything together and leave it to sit for half an hour (or longer, if you prefer).
  2. Put your tomato mixture on a medium heat on the hob, and boil until reduced. Stir it occasionally to stop it catching on the bottom of the pan. How long this takes depends on how rich you’d like your tomato topping, how big your pan is, how high your heat is, and how many tomatoes you have. Personally, I cook mine for about an hour until I have a thick, rich, fragrant tomato base that is like the consistency of a tomato jam.
  3. Slice your bread into handy bitesize pieces. Heat a good glug of olive oil and a knob of butter in a large frying pan until foaming, then fry your bread, turning occasionally, until crisp and golden. Try not to let the butter burn. When the bread is fried, drain it on kitchen paper, then cut your remaining clove of garlic in half and rub both sides of the bread with the cut side of your garlic.
  4. Top each piece of bread with a generous dollop of the tomato mix, then finish with a torn piece of mozzarella and a basil leaf.

DSC_0024-683x1024